September Design Team Reveal

September is drawing to a close and here in Michigan Fall is making its presence known. It has been raining, overcast, and chilly. So let's take a look back at the end of summer with the bright colors from the September kit. Don't forget to scroll down a few posts to see the sneaks of the October kit.


"Like A Real Man" by Tonya Dirk Tonya really showed off her son's pipes in this layout. The bright colors work so well for boy or girl layouts. And I love how she used those numbers as an embellishment as well as to tell the story.

"Kindergarten" by Stacy Cohen I really love the clean layering and design and how Stacy made that little Maya Road chipboard house look like a real schoolhouse with the white outline.


"So Silly" by Rachel Hall Awesome layering in this 8 1/2x11 layout from Rachel. She added a vintage children's book page here and added her signature hand stitching border around the page. I also love the arrangement of the photos.

"Heart Song" by Lucy Edson This photo is fantastic but my favorite little part of this layout is the rubon on top of the white space in the photo. It just speaks volumes for this picture. Lucy also did some fantastic handcutting and layering here.


"Escape" by Larissa Albernaz I am in love with the banner Larissa made that goes across the bottom of the page and the embellishments she added to it. I also love the splatter of ink. Great picture as well.


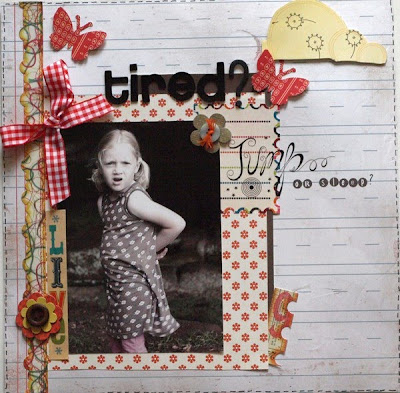
"Tired?" by Hilde Janbroers Keeping with the handcutting a lot of the girls did this month is this layout from Hilde. She cut those clouds from the Cosmo Cricket Earth Love paper. She also layered a few piece of the patterned papers along with a journaling spot.


"Thank you" by Karen Grunberg Our resident simple scrapper took some very busy patterned papers and toned them down by including bits here and there. Her perfectly lined up journal strips and small and elegant embellishments don't compare to those blue eyes. Do I even need to comment on what a handsome guy David is becoming? I think not.

Unfortunately, Mia has been suffering from some poor Internet issues and has not been able to post her projects yet, but let me assure you they are coming. She even has some instructions coming for assembling a mini album using the kit's Melissa Frances mini album and some mists as she is known to use every now and then. So stay tuned and I will be sure to point out her projects when we get them posted.
Be sure to browse through the Design Gallery for further inspiration.

Technique Tuesday with Lucy Edson

Hi, Lucy here with an idea for using those mists in your stash. I love embossing and clear embossing powder will act as a resist to let your background paper show through when you mist over it. Let me show you what I mean. I made an accent on this card using this technique.

You will need the following supplies:
Paper
Stamp
Clear embossing powder
Embossing ink - I use a Versafine Watermark stamp pad
Stamp your image onto the background with Watermark ink and sprinkle with embossing powder.

Heat with a heat gun until clear and shiny.

When cool, spritz with your favorite mist. I used Shimmerz Spritz in Licorice. The mist will bead up over the embossed image. Let it sit for a minute.

Wipe mist off embossed area - here is the result. I love the glossy shine from the embossing contrasting with the shimmery mist.

A close-up of how I incorporated this technique into in this card from some of my Sassafras Lass scraps left over from the AMM September kit and a few little goodies from my stash.
Thanks, and hope this might make you take a different look at your stamps. See you soon!

Member Monday with Wendela Lam

Welcome to a new Member Monday. This week's Layout of the Week was chosen by Wendela Lam. She chose this layout by Kathleen Glossop, also known as **Kat** on the boards.


Here is what Wendela had to say about choosing this layout. "I love flowers and what Kathleen did with the picture of this darling little girl. The fabric of her clothes is almost the same as the flowers she used!"

"Flowers" by Kathleen Glossop


Here is a little interview Wendela had with Kathleen. Read on to learn more about her.
1. How long have you been scrapping and what got you started? I've been scrapping for over 4 years and started after attending a (*ahem*) Creative Memories class, lol. I quickly discovered the local scrapstore (and some not so local ones!) and was instantly addicted to all thepretty papers and embellishments.
2. What are your must have tools for scrapping? My Zig Writers & Slick Writers for doodling, my paper piercer for a touchof hand stitching, and 3D tape - I LOVE dimension
3. What are your favorite manufacturers? Sassafras Lass....Sassafras Lass.....oh oh, & Sassafras Lass ;P I'm also loving Nikki's (Sivils) gorgeous bright papers too, and Scenic Route.
4. Where do you look for inspiration when creating? Blogs & online galleries. I'm an internet addict, lol, and find my fellows crappers such an inspiration. All those different ideas and techniques, it's such an awesome community to be a part of.

Leave Kathleen some love on this post or directly on her layout here. You can view more of Kathleen's gallery here.

Little Something Sunday with Hilde Janbroers

Economy Buster-Reuse That Packaging!
The great things, besides the gorgeous Prima flowers, are the packages! They are great to use on a layout, card, or even create a mini album with them. I used them on a layout, and I think it's amazing to use! Just see for yourself.

October Kit Sneak!!

Check out our sneaks of the October kit below then click here to go an order yours. With brand new October Afternoon, Jenni Bowlin, and soem Pink Paislee and Prima for good measure, this kit is delightful.
Check back on October 1st for the full reveal!!

New in the AMM Store This Week...

October Afternoon is at it again with two brand new collections that are so super sweet. If you preordered collection packs, those should be arriving soon.

First up is the new "Recess" line which features awesome school themed vintage nostalgia from the workbook style patterned paper, the argyle print, to the handwriting practice sheet. I am in love. Embellishments to accompany these collections will also be arriving shortly. Have a look at Recess below and be sure to stop by the shop to get yours before it is all sold out, as the journal cards for this collection already are!

New to October Afternoon are the Mini Market Alphabet Stickers
The Papers.


Next up is the other new line, "Farm Fresh" I think this line would be great to use for a gift recipe mini book for the holidays. I love the print pattern on one side and the graphic pattern on the other. And I am always a sucker for cute farm animals and some book text patterned papers.


And the super cute Journal Cards, still in stock.

Be sure to check out the rest of the October Afternoon section of the store to stock up on past favorite collections and be sure to watch the "What's New" Section for when the embellishments and collection packs arrive.

October Guest Designer Reveal!

October is upon us, which means it is almost time for a new kit and a new guest designer! This month we have the fabulous Cindy Tobey who I have been following on Two Peas for quite some time. I really love her style and the fact that she is from the great state of Michigan doesn't hurt either! So, without further adieu, I introduce you to our October Guest Designer, Cindy Tobey!!


Bio
I have been all about making art ever since elementary school. I went to college for Graphic Design and worked in that field until I had my daughter, and decided to be a stay-at-home-mom. I enjoy many forms of art: painting, drawing, photography, quilting, knitting, and of course scrapbooking. I love scrapbooking because I am able to combine so many of my other creative loves into this one art form. I was honored to be inducted into the Creating Keepsakes 2008 Hall of Fame and I am excited to be a member of the Creating Keepsakes 2009 Dream Team. I am also a member of the Fancy Pants Design Team and I enjoy doing contract design work for other manufacturers as well.
Happy Birthday - Published in Creating Keepsakes, June 2009 issue
Higher - Published in Creating Keepsakes, July 2009 issue
Irresistible - Published in Creating Keepsakes, July 2009 issue

Design Team Challenge with Susan Dupre

YOUR SCRAPPY DIET: DO YOU HAVE ENOUGH FIBER?
Ok, is that a scary hint for ya? Yes, you got it!! This is going to be a fiber challenge!!! I have heard that using fibers is something a lot of us just don't know how to use on a layout. I was inspired by Sherry's book for this, but I won't give you any hints about it. You'll just have to buy it!! LOL

What I want you to do is get creative!! I don't care how you use them but I want some fibers on your layouts, card or altered item!! I will give you a $20 gift certificate to any online scrapstore of your choosing if you win!!

Here are two past examples of where I used fiber. I am going to play along, and I have an idea brewing up in that wee little brain of mine. I'll be working on mine as well.


On the above layout, you can see some bright colors in one of the lower rays. I cut the fibers and clued them down.

On the above, it is not very creative, but I used it on this older ATC that I made. I plan on trying to get really creative with my fiber on my layout that I do. I hope you do too!! Have fun, and I really hope you challenge yourself to do this. I know fibers aren't our favorite scrappy item. LOL, that is why I am doing it!! I love abusing my friends!!

Be to entered to win Susan's sweet prize be sure to upload your projects to the gallery and to this thread by midnight on October 3rd. Good luck and happy scrapping!

Technique Tuesday with Rachel Hall

Quick and Easy Fall Mini Album

Supplies Used:
Maya Road Coaster album
Yellow Paint
Orange Paint
Brown Paint (not pictured)
Leaf Punch
Patterned Paper
Ribbon (not pictured)
Flowers (not pictured)
Chipboard heart (not pictured)
Maya Road Sheers (not pictured)
Rhinestones (not pictured)
File or sand paper

To create this Quick and Easy Mini Album:

1.) Take album coaster pieces off of ball chain. Save the chipboard tag that is on it as well!

2.) Using the embossed cover piece, create a tree trunk template by using printer paper and a pencil and rubbing the pencil over the paper on top of the embossed piece. Cut out the trunk.

3.) Paint the chipboard coasters. Paint three of each the yellow and the orange. On your cover piece that is embossed, paint the tree trunk brown. Let dry. Sand or file edges for a distressed look. You can also sand the top of the embossed piece to let the design show through the paint.

4.) Using your template and your patterned paper, cut out ten tree trunks. Ink or distress if desired.

5.) Using your leaf punch, punch out leaves using a variety of patterned papers. Ink if desired.

6.) For the cover, add leaves where desired. I also added a heart to the trunk with a flower. Add your title.

7.) Using small prints (wallets for example), decorate your pages. Add leaves where desired and flowers, rhinestones and ribbon bits.

8.) Cover both sides of the small chipboard tag with patterned paper. Ink or distress edges and add embellishment of your choice.

9.) Using the ball chain, put your book together.

10.) Tie bits of your ribbon to the chain.

Enjoy!


Thanks Rachel, this album is so perfect for fall!!

Member Monday with Rachel Hall

On this Member Monday we have Rachel Hall's selection of this fabulous school themed card designed by Danielle Flanders.

Here is what Rachel had to say about choosing this super cute card. "I chose this delightful A+ Teacher card by Danielle Flanders (DanielleFlanders) because I was immediately drawn to the innovative use of hand-stitching that she used to highlight the pattern of the notebook print patterned paper. It took an already wonderful design and took it to the next level that you can't help but stare at. Topping it off with a perfectly placed embellished star sentiment makes this a card that would surely be treasured by any one lucky enough to receive it. Thank you Danielle for sharing your wonderful creations with A Million Memories!"


Here is a bit more from Danielle on this card. "I hand stitched over some of the lines in the paper to bring out the design. Imaginisce paper, AC Thickers, Melissa Frances star die cut and Jenni Bowlin letter stickers."
A+ Teacher card by Danielle Flanders

Rachel caught up with Danielle for a litle interview, so read on to get to know her better.
1.) When did you start scrapbooking? I started almost 10 years ago when my first daughter was born to create a baby book for her. A friend of mine introduced scrapbooking to me and showed me how to cut my photos in all kinds of weird shapes. I wasn't too sure about that at first! But seeing all of the papers and fun products out there hooked me. (I'm so glad I don't have to cut my photos anymore!)

2.) A Layout, card, etc is not complete without: ribbon, stitching or a new technique that I've been wanting to try.

3.) How would you define your style? I would say my style is one part shabby, one part clean and one part colorful. I'm trying to break out of the mold and play more with the artsy style. I just love to try new techniques and use items in a unique way.

4.) What are you most grateful for regarding scrapbooking? I'm so grateful for the chance to have met so many people on-line who love scrapbooking as much as I do. I also feel blessed to be part of a few great companies, such as Pink Paislee. I'm grateful for the chance to tell my girls my stories and also just to have time to be creative!

5.) Where do you go when you need a good dose of inspiration? Mostly on-line. I love visiting a variety of blogs and galleries! I will jot down ideas of things I'd love to do on a page and sketches and go from there. Usually that will spark another idea for me! There is a list of some of my favorite scrappers on my blog: www.danielleflanders.blogspot.com. New products always seem to inspire me also.
You can leave Danielle some love on this post or directly on her card in the gallery here.

Little Something Sunday with Wendela Lam!

Go Green & Recycle!
What I made is an altered notebook. I got this book from a friend, and when I saw it…..I was really inspired to make something with it using tissue paper and a lot of gesso.

1. I found a little wooden frame, and smeared it with gesso, and put it on the book.

2. After that, I added some white feathers from my own chickens,

3. A prima flower sprayed with some Glimmer Mist (Frosty Nights)

4. And some white mica flakes…love the glimmering on it!!!