January Kit Sketch

January Kits have made their way out the door and here with some inpiration for you is Lucy Edson who put together this sketch for you to use with the kit or any other product you choose.

I have a really great layout idea for this sketch and the kit. We will be back soon with the design team's interpretation of the sketch soon. Can't wait to see what you do with it!


Technique Tuesday with Rachel Hall

Creating Card Keepers
Every Christmas I am unable to even think about getting rid of all the beautiful cards that we receive. To solve this storage dilemma and simply answer the question of what to do with them all, I began creating card keepers in 2007.


Supplies:
Your Christmas Cards
Cardboard, chipboard, old book covers, etc for your front and back covers
Ribbons, binder rings or a binding mechanism to bind project
Patterned paper and embellishments to decorate your cover

To Create a Card Keeper:
1.) Gather your cards in a pile and set aside
2.) Decide on what material you will use for your covers. I have used both heavy chipboard and vintage book covers. Other thing you could use would be cardboard or premade book covers like these 7 Gypsies ones included in the December Monthly kit.
3.) Using your papers, embellishments etc decorate the front cover. If you are using plain chipboard you will want to cover the back and inside covers a well for a more finished look.
4.) Decide how you will chose to bind your book. If you are using ribbons or binder rings, mark where you want them and punch holes in the front and back covers. If you are using a bind-it-all, punch the covers using your machine.
5.) Arrange your cards in the order that you would like them in and mark and start punching your holes or run them through the bind-it-all.
6.) Assemble your card keeper by tying your ribbons or attaching everything with your binder rings or bind it all binding.

You can create these keepers for any event in which you receive a large number of cards or use binder rings to create ones that you can keep on adding to every year. Some ideas for events in which a Card Keeper could be used:
Engagement
Wedding
New Baby
New Home
Birthdays (you can create ones for each or make one you can add to each year)
Sympathy
Valentines (again, you can create them yearly or add to one each year)


Member Monday with Tonya Dirk

With the first Layout of the Week in 2010, we have this really pretty ornament designed by Leigh Penner chosen by Design Team Coordinator, Tonya Dirk.
"Peace & Joy" by Leigh Penner
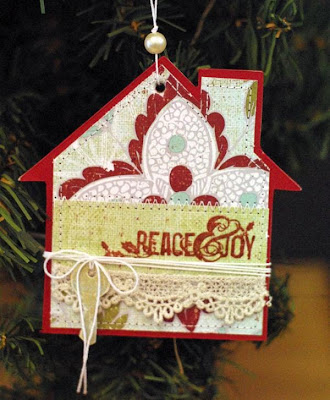
Here is a quick little interview Tonya did with Leigh, so read on to get to know her a little better.
1) What are your favorite colors to scrap? Red & teal blue.
2) Family members? If married, how did you and your hubby meet? My husband & I met my first year of teaching. He was working as a learning assistant for the same school division and came along to help us out with our grade 6 camp-out. We sat around the fire together one evening and the rest is history. We've been married over 13.5 years and have three children.
3) Other interests aside from scrapbooking? In the summertime, I like to run. Year round, my son & I take tae kwon do together. I also love to read.
4) If you have any job in the world what would it be and why? I would love to be a voice actress for animated movies. I just think that would be such a fun job!
You can check out Leigh's blog here and the rest of her AMM gallery here.

Little Something Sunday with Staci Taylor

Making paper piecing cool again!
I think when most current-day scrappers think of paper piecing, they think old-school scrapping, complete with photos cut into shapes and stickers slapped down all over the page.

I'm here to show you, however, that paper piecing can look cool on a layout :-) I'm not that into "themed"/event layouts, but I really wanted to document the fact that we had a Christmas tree made out of Lego's this year. To support my holiday theme, I made a big Christmas tree as a backdrop on my page.

If you would like to replicate the look, you can print out this Christmas tree pattern that I found online at wittyliving.com. Or you can make your own, like I did. I simply folded a piece of cardstock in half and free handed a Christmas tree on one side.

I then cut out the tree while the cardstock was folded so that I would have a symmetrical tree. Lastly, I added a tree trunk in a different color to the bottom of my tree.

There are a lot of paper piecing patterns online, but it's also easy to make your own!

Documenting Your New Year's Resolutions

It's that time of year. A new year full of promise and fresh starts. time to wipe the slate clean so to speak and set new goals for yourself. Sometimes the act of putting the goal or resolution down in writing helps you to keep focus on it. According to newyearsresolutions.com these are the top 10 most popular resolutions. See any of yours on the list?

1) Spend More Time with Family & Friends
2) Fit in Fitness
3) Tame the Bulge
4) Quit Smoking
5) Enjoy Life More
6) Quit Drinking
7) Get Out of Debt
8) Learn Something
9) Help Others

Did you know that making resolutions isn't a modern fad either. According to 43things.com, "Revelry and resolutions have been essential to ringing in the New Year since 2000 B.C. when Babylonians held semi-annual festivals around the spring and autumn equinoxes. Back then, people marked the beginning of a New Year by paying off debts and returning borrowed goods. The practice carried over into Roman times with worshippers offering resolutions of good conduct to a double-faced deity named Janus, the god of beginnings and endings. When the Roman calendar was reformed, the first month of the year was renamed January in honor of Janus, establishing January 1 as the day of new beginnings."

So if you are thinking of how to document your New Years' Resolution, have a look at these two very different examples from designer Rachel Hall.

In this example from 2008, Rachel created a canvas using lots of different techniques. A visual reminder might be just the thing you need if you find yourself falling short of your goal.


Here's an example from 2009. I love the picture here. At the bottom, Rachel typed out a bunch of words that would inspire her in the new year and some areas of her life she wanted to be sure she kept focused on.


So what resolutions or goals did you set for yourself in this new year? We'd love to read them and maybe inspire one another, so leave a comment here and share.

January Kit Reveal! AVAILABLE NOW!

Here is the debut of our January 2010 Kit! Get yours here.

JANUARY 2010 Monthly Kit *UP AND AWAY: A GRAND AFFAIR*

Papers:
5 Websters Pages Papers
1 Basic Grey Origins Paper
1 Hambly Paper
1 Prima Art Stitched Mulberry Paper

Embellishments:
American Crafts Glitter Thickers
Prima 12 x 12 Chipboard Journaling Spots
1/2 Pack of Prima Camelot Roses
Prima Say It In Pearls Soft Green
1 Hambly rubon Frames
3 Websters Pages Fabric Fancies Cut Shapes (pieces will vary)
1 yard AMM white vintage lace
1 yard AMM green vintage lace
1 yard AMM white eyelet trim
AMM vintage silver crystal buttons


Here are some detail shots.


December Kit Design Team Reveal

Today we are taking a last look at the December kit design gallery as we say goodbye to 2009 and hello to 2010.

First we will start with out December Guest Designer, Jamie Harder who created this clean and graphic layout.
"Festival of Trees" by Jamie Harder


Next is this clean and graphic layout by Karen Grunberg. I love the pop of green she added with the Prima packaging.
"Playing Together" by Karen Grunberg


Next is this layout by Kat Glossop using the December sketch. I really love her interpretation here and the little cut out from the 7 Gypsies ephemera.
"All Mine" by Kat Glossop


This layout by Lucy Edson features a vintage picture of herself that she scanned and edited. I lie how she used he red as an accent color here.
"Your Future" by Lucy Edson

This layout by Rachel Hall is so sweet. I love the vintage lace she put around the edge of this round layout.
"Our Christmas Angel" by Rachel Hall


This bold and graphic layout is by Sasha Holloway. I love her layered circles.
"Cool Chick" by Sasha Holloway


I love the concept behind this next layout by Staci Taylor. Her title centered in the middle of all the journaling is really striking.
"My Promise" by Staci Taylor


And last but not least is this really pretty layout by Design Team Coordinator, Tonya Dirk. I love how the red takes center stage in this layout and the piece of the round die cut paper poking out of the top right corner.
"Beauty Aglow" by Tonya Dirk


You can see the rest of the design team projects in the Design Gallery here or pick up one of the few remaining December kits here. Have a happy and safe New Year!

Design Team Challenge with Staci Taylor

Hi everyone! My challenge to you is to incorporate transparencies into a layout. You can use a transparency as a background like I did on this layout:


Or you can use transparencies to back "windows" that you create on your layout like I did in these examples (the first one uses a patterned transparent paper):


Or you can use a transparency to create a layer on your page like I did on this layout:

The possibilities are endless when it comes to using transparencies, and I can't wait to see what you all come up with! Be sure to post your layout in this thread or link us up in the gallery so you can be included in a random drawing for a RAK that I will do at the end of this challenge.

Technique Tuesday with Leeann Pearce-AMM Member

This week we have a Technique Tuesday from an AMM Member, Leeann Pearce. Today she is going to show the quick steps she follows to make these custom denim embellishments.

How to make your own “Denim Cloud and Circle Buttons”

Step 1:
Draw a cloud template and trace onto scrap of denim. Draw some circles too.

Step 2: Cut out the shapes. Now you have 2 options to stiffen the fabric:
1- Back shape with a smaller piece of cardstock
2- Give a couple of coats of a gel medium (but not the edges)

Step 3: Once shapes are dry from the medium, stamp a design using bubble wrap and paint.

Step 4: Use your Crop-a-dile and punch holes and set eyelets. Thread with wool and knot. Add detail stitches to the circle buttons using embroidery thread. Now just fray the edges using your fingers.


All finished - now just scrap a layout using your handmade denim buttons.


Here are some detail shots.


Thanks Leeann! These are really cute and a really affordable and green way to scrap. If you would like to see a technique of yours posted her on the blog to share with the AMM community be sure to email instructions and full color pictures to myself or Michelle.