

Technique Tuesday with Mia Caniza
Paper & Pixels: Creating a Hybrid Page
I’ve always been a die-hard traditional scrapper and I’ll be the first to admit that even as recently as 3 months ago I was not a fan of digital scrapbooking. It’s not that I didn’t appreciate it, as most of what we use to scrap with starts out in some digital form, but I just love the feel of paper & embellishments in my hands.
This past month I decided to check out what it was all about and why people rave about this form of scrapbooking. I tried out the online digital scrapbooking site and for the first time I actually enjoyed myself. After realizing that digi can actually be fun, I set out to try & incorporate some digital designs into traditional scrapbooking. I searched high and low for digi products that would get me interested in actually incorporating them into my pages. I finally found them in Kitschy Digitals (http://www.kitschydigitals.com/). Their stuff has enough funk without being too funky & vintage without being too vintagey, in other words it works with my scrapping style. I bought a couple of their products so that I could try my hand at creating a hybrid page.
In creating my first hybrid page, I tweaked the colors of some of the digital elements to match the colors of my picture & products. Prior to this I only had basic knowledge of Photoshop CS3, so I looked for tutorials on how to edit the colors to suit my page. There are several tutorials online on how to do this just make sure you look for one that suits your version of Photoshop. After some editing, resizing, & fun photo actions, here’s the result of my first hybrid page.
Materials:
-Digital Kits (I used the Kitschy Digitals Olivia Kit & Washi Tape Frames Kit)
-Photoshop
-White Cardstock
-Printer
-Patterned Paper
-Chipboard Alphabet for title
-Chipboard Shapes
-Vintage Trim
-Baker’s Twine
-Pearl Bling
-Spray Ink
-Number Stamps
-Ink
-Foam Tape/Adhesive
-Sewing Machine (optional)
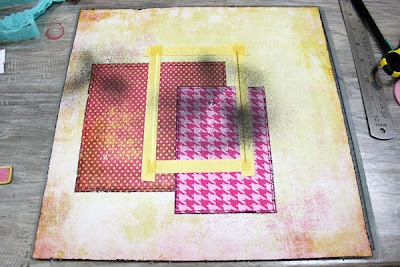
1) Tweak, resize & print out all the digital elements you will be using for your layout. I altered the color on the digital fabric roses (originally peach turned pink & yellow) & the houndstooth paper (originally pale blue turned pink) to match the colors in my photo. I also resized the tape frame to fit the size I needed on the page. I printed these on letter sized white cardstock. Once they are printed out, cut out the designs you want to use.

2) Take your base patterned paper, I used Basic Grey Lemonade Sun Kissed, distress the edges w/ an edge distresser & ink edges. Cut a piece from another sheet of patterned paper, again I used Basic Grey Lemonade Strawberry Patch, & distress the edges & ink it. Place it on your base sheet & stitch around the edges w/ your sewing machine. Repeat the same process for the patterned paper from the Kitschy Digitals kit & layer over the Basic Grey paper.

3) Take the Washi Tape frame from Kitschy Digitals & layer it over the 2 patterned papers, slightly offsetting it to give the frame interest. Adhere to page.

4) Now to add a bit of funk & fun, take some spray ink, I used Maya Mist’s Charcoal here, & spray in certain areas of your page to add some interest.
5) Place photo on top of layered patterned paper & digital washi tape frame.

6) Start layering embellishments & digital elements onto the page. I started out w/ some vintage aqua eyelet trim from A Million Memories, a chipboard swirl from Basic Grey Lemonade chipboard shapes, a cutout of a cluster pink velvet leaves & a cutout of a cream vintage button, both digital elements from the Kitschy Digitals Olivia Kit. I used some foam tape to pop up the velvet leaves in order to give it more dimension.

7) Layer additional embellishments on your page around the left side of the photo. I added some pink & yellow digital fabric flowers I had cutout, layering them on top of each other & using foam tape on some to add dimension. I also layered a chipboard border near the bottom of the layered patterned papers. I cut out a butterfly from the Basic Grey Urban Prairie Patchwork Quilt paper that was leftover from the July kit & glued it near the chipboard swirl, I made sure to only glue the center so I could fold up the wings to add more dimension. I wrapped some brown baker’s twine around the page twice and tied it in a bow through a chipboard tag from the Basic Grey Lemonade chipboard shapes. For the title I layered American Crafts Dolce Fabric Thickers in aqua over each other & used my sewing machine to stitch through them. I went over the title three times. Make sure to use a denim needle and go slow!
8) After adding the title & sewing it down, I added some final touches to the page. I placed several yellow & pink pearl bling from Kaisercraft around the cluster of embellishments near the photo. I also added a Maya Road pearl stick pin through the chipboard tag, stamping the numbers ‘2009’ before doing so with Stazon & the Hero Arts Basic Alpha set. I also added some aqua ones near the bracket chipboard border as accents.
9) Print out your journaling on to cardstock, cut into strips & adhere to the page as the final touch.

I’ve always been a die-hard traditional scrapper and I’ll be the first to admit that even as recently as 3 months ago I was not a fan of digital scrapbooking. It’s not that I didn’t appreciate it, as most of what we use to scrap with starts out in some digital form, but I just love the feel of paper & embellishments in my hands.
This past month I decided to check out what it was all about and why people rave about this form of scrapbooking. I tried out the online digital scrapbooking site and for the first time I actually enjoyed myself. After realizing that digi can actually be fun, I set out to try & incorporate some digital designs into traditional scrapbooking. I searched high and low for digi products that would get me interested in actually incorporating them into my pages. I finally found them in Kitschy Digitals (http://www.kitschydigitals.com/). Their stuff has enough funk without being too funky & vintage without being too vintagey, in other words it works with my scrapping style. I bought a couple of their products so that I could try my hand at creating a hybrid page.
In creating my first hybrid page, I tweaked the colors of some of the digital elements to match the colors of my picture & products. Prior to this I only had basic knowledge of Photoshop CS3, so I looked for tutorials on how to edit the colors to suit my page. There are several tutorials online on how to do this just make sure you look for one that suits your version of Photoshop. After some editing, resizing, & fun photo actions, here’s the result of my first hybrid page.
Materials:
-Digital Kits (I used the Kitschy Digitals Olivia Kit & Washi Tape Frames Kit)
-Photoshop
-White Cardstock
-Printer
-Patterned Paper
-Chipboard Alphabet for title
-Chipboard Shapes
-Vintage Trim
-Baker’s Twine
-Pearl Bling
-Spray Ink
-Number Stamps
-Ink
-Foam Tape/Adhesive
-Sewing Machine (optional)
1) Tweak, resize & print out all the digital elements you will be using for your layout. I altered the color on the digital fabric roses (originally peach turned pink & yellow) & the houndstooth paper (originally pale blue turned pink) to match the colors in my photo. I also resized the tape frame to fit the size I needed on the page. I printed these on letter sized white cardstock. Once they are printed out, cut out the designs you want to use.

2) Take your base patterned paper, I used Basic Grey Lemonade Sun Kissed, distress the edges w/ an edge distresser & ink edges. Cut a piece from another sheet of patterned paper, again I used Basic Grey Lemonade Strawberry Patch, & distress the edges & ink it. Place it on your base sheet & stitch around the edges w/ your sewing machine. Repeat the same process for the patterned paper from the Kitschy Digitals kit & layer over the Basic Grey paper.

3) Take the Washi Tape frame from Kitschy Digitals & layer it over the 2 patterned papers, slightly offsetting it to give the frame interest. Adhere to page.

4) Now to add a bit of funk & fun, take some spray ink, I used Maya Mist’s Charcoal here, & spray in certain areas of your page to add some interest.

5) Place photo on top of layered patterned paper & digital washi tape frame.

6) Start layering embellishments & digital elements onto the page. I started out w/ some vintage aqua eyelet trim from A Million Memories, a chipboard swirl from Basic Grey Lemonade chipboard shapes, a cutout of a cluster pink velvet leaves & a cutout of a cream vintage button, both digital elements from the Kitschy Digitals Olivia Kit. I used some foam tape to pop up the velvet leaves in order to give it more dimension.

7) Layer additional embellishments on your page around the left side of the photo. I added some pink & yellow digital fabric flowers I had cutout, layering them on top of each other & using foam tape on some to add dimension. I also layered a chipboard border near the bottom of the layered patterned papers. I cut out a butterfly from the Basic Grey Urban Prairie Patchwork Quilt paper that was leftover from the July kit & glued it near the chipboard swirl, I made sure to only glue the center so I could fold up the wings to add more dimension. I wrapped some brown baker’s twine around the page twice and tied it in a bow through a chipboard tag from the Basic Grey Lemonade chipboard shapes. For the title I layered American Crafts Dolce Fabric Thickers in aqua over each other & used my sewing machine to stitch through them. I went over the title three times. Make sure to use a denim needle and go slow!
8) After adding the title & sewing it down, I added some final touches to the page. I placed several yellow & pink pearl bling from Kaisercraft around the cluster of embellishments near the photo. I also added a Maya Road pearl stick pin through the chipboard tag, stamping the numbers ‘2009’ before doing so with Stazon & the Hero Arts Basic Alpha set. I also added some aqua ones near the bracket chipboard border as accents.
9) Print out your journaling on to cardstock, cut into strips & adhere to the page as the final touch.

You may find some of the Basic Grey Lemonade products I used, here.
Similar colors of the American Crafts Dolce Fabric Thickers may be found here.
Some colors of Maya Road Maya Mist may be found here and a similar color of the Maya Road Pearl stickpins can be found here.
The vintage aqua eyelet trim that I used can be found here.
You can also find different colors of baker’s twine here.
The fun Kitschy Digitals products may be found here.
I hope that after seeing how relatively easy & fun it is you will consider adding some digital elements to traditional ones. You can create some amazing pages with these printable digital elements & open up a whole new world of possibilities. You just need to find digital kits & elements that suit your scrapping style so you can mix it in with the traditional products you already use normally. I know I, for one, will be doing more hybrid pages in the future after having a blast with this one. Glad I finally got around to trying it & I hope you will too!
1 comment:
Mia!!! This is so AWESOME! What a stunning page! Love the tut! Thank you!
Post a Comment