Little Something Sunday with Marie Ramirez

Last week we focused on on clouds and rainbows so this week we're going to focus on flowers. You know the old adage, April showers bring May flowers. To get us started off Marie is going to show us how to make a tissue paper flower.

1. Cut a strip of tissue paper the length of the paper and width 4.5 inches fold in half long ways.


2. begin shredding paper with your scissors, start at the fold. I use my Martha scissors for this. I love them.


3. Roll flower long ways.


4. Adhere bottom of flower with glue.


5. Scrunch and pinch. Your flower is done.

April Design Team Reveal

More fantastic projects from the design team using the Chloe Lou April Kit.


"Believe in Your Dreams" by Ro Philppsen


"Imagination" by Staci Taylor


"Let the Journey Begin" by Ro Philppsen


"My Girl" by Ro Philppsen


"Sweet as Candy" by Staci Taylor

April Design Team Challenge Winner

Congratulations to Camila Borssoi for being this months sketch challenge winner.


"Infinitos" by Camila Borssoi


Thanks to everyone who participated. Look for the May challenge to be posted soon.

Technique Tuesday with Michelle Quinn

Today we have a special treat for you. Michelle is going to share a little something with us.

Hi all. I thought I'd share a little something that I made using a few things from the March AMM kit (which you can find HERE). I'm a lover of clothespins. Just think they are super cute and when I saw a big ol' pack of them at a local craft store, I snagged them up. As I was sitting with the March kit, I came up with an idea to make these little magnets. Here's what I used:


On my first clothespin, I used my ink and just dabbed the pink paint on. Nothing precise or perfect. Just a messy dabbing of paint. Then I grabbed one of the little My Minds Eye stickers and stuck it on top once it was dry. I cut off a piece of an old magnet and glued it on the back with Fabri-Tac glue.


On my other clothespin, I just grabbed the My Minds Eye chipboard and firmly pressed it on top of the clothespin and then again, cut a strip from the old magnet and glued it on using Fabri-tac.


Voila! I had 2 cute little clothespin magnets to hold up my kids' artwork or projects on the fridge (they always like when their hard work is displayed).

If you have ideas for clothespins, show us! Link us up, or post in our gallery. We'd love to see.

Member Monday with Jennifer Longenecker

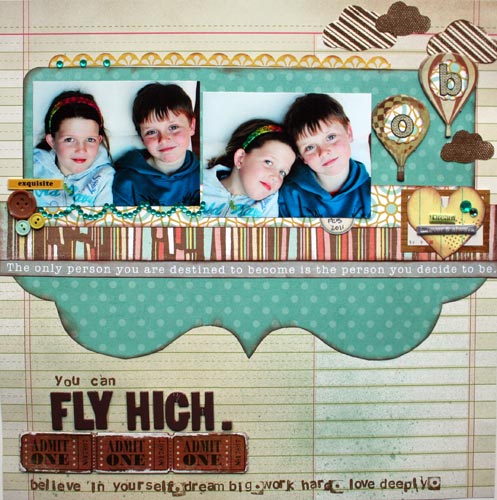
This week it was my turn to choose the Layout of the Week. I chose this LO by Deanna Misner.


I love everything about this LO from the white space to the way she matted her photo, but my favorite thing is the orange banner. I just adore the way she doodled on it and the way the banner lays.


I asked Deanna a few questions to help us get to know her a little better. Here's what she had to say...


1. What is your favorite thing about scrapbooking? I love the process. I love how a layout comes together, how going through the "what if I try this" questions end up being a part of my creation. And of course I love all the fun stuff too--handcutting, misting, doodling, embellishing...


2. Are there any things that seem to constantly appear on your LO's? I'd probably say I draw, outline or doodle on almost all my layouts. I like the blocked look too-the "framed" layout look. And I like to play with techniques too.


3. Do you have any other hobbies? This time of year, I love spending time planting flowers and starting our family's garden. I also love taking pictures, watching "my" shows, and reading.


4. Do you have any funny quirks you want to share with us? I have some silly scrapbooking quirks, like if I have buttons on a page their holes can never be exactly horizontal or exactly vertical. Silly I know. And I almost always post my latest LO on our refrigerator when it's finished. Then I walk to the other side of the room to get an idea of what it will look like as a thumbnail.

Little Something Sunday with Ro Philippsen

1 - Cut two identical clouds and overlap them.


2 - Make holes around the clouds, for handmade sewing.


3- Begin sewing by hand and before you close the seam, insert cotton, to leave it with volume.


4 - Complete the sewing.


5 - And you'll have a cute cloud for your layouts!

April Design Team Update

We've got a lot of inspiration to share with you from our design team members using the April Kit Chloe Lou.


"A Day to Remember ATC" by Marie Ramirez


"A Happy Place" by Marie Ramirez


"A Tasty Meal" by Jennifer Longenecker


"Big Girl Bike" by Staci Taylor


"Egg Count Down" by Marie Ramirez


"First Signs of Spring" by Jennifer Longenecker


"Fly a Kite" by Marie Ramirez


"Let the Journey Begin" by Marie Ramirez


"Long Line of Love" by Wendy Sommers


"My Girl" by Marie Ramirez


"Outdoorsy" by Wendy Sommers


"Sweet and Gracious" by Wendy Sommers


"The Big Ride" by Jennifer Longenecker

Design Team Challenge Update

1 Day Left!


Tomorrow is the end of our April sketch challenge. Participating in these sketch challenges is a great way to earn add a little to your scrappy stash. The winner, chosen by our host, will receive a $10 gift certificate to the A Million Memories store. So I have one question for you ... what have you got to lose? Get to creating!


Here's a LO submitted by Wendy Antenucci...


"I Spy" by Wendy Antenucci


Thanks for sharing your LO with us Wendy! I love the little window frame.


Check out this thread on the message board for more details on this months challenge.

Technique Tuesday with Staci Taylor

When I think of Spring, one of the first things that comes to mind is butterflies, so today I am going to show you how to make a butterfly mobile using the technique of heat embossing. You will need a butterfly stamp, watermark ink, transparencies, embossing powder, a heat gun, some string or twine, a small piece of ribbon, and something to hang the butterflies from (you could use little tins like I did, or something like an embroidery hoop, etc.) The first thing you will need to do is make your butterflies. Stamp your butterfly stamp onto a transparency using watermark ink. Next, use your embossing powder of choice and heat emboss the stamped image (I used a glitter pink, silver and white embossing powders). Repeat to make as many butterflies as you'd like for your mobile. Next, you need to punch a hole in the top of the butterflies you made and string twine or another type of string through them. Now you will attach your strings to your mobile "hanger". If using an embroidery hoop, you could just tie them on. Since I attached mine to these tins, I actually just taped them on the inside of the tins. I also added some pearl embellishments to my tins - you could embellish your "hanger" as much or as little as you'd like. Now you just need to attach a ribbon to the top of your hanger and your butterfly mobile is ready to hang!

Member Monday with Ro Philippsen

Welcome to another Member Monday. This week's Layout of the Week was chosen by Ro Philippsen and she chose this LO by Camila Borssoy: Here's What Ro had to say about the LO: "This Camila's layout is so rich in detail and so perfect, it deserves to be highlighted on "Member Monday" today.Congrats dear, your page is wonderful!" Ro also asked Camila a few questions so we can get to know her better. Here's the interview... 1. Why do you scrapbook? I started scrapbooking with the purpose to register my memories in 2006. Today Scrapbook goes deeper than that, it becomes a way to express myself, my moment and feelings. 2. What is your favorite source of inspiration? I don't have a favorite source of inspiration. I get my inspiration from my daily life: quotes that moves my heart, my favorite movies, landscapes, scrapbooking classes, great pictures and papers. 3. How long do you spend on your average layout? I can spend 3 hours working on it, as I can spent some days... lol... Sometimes I think there is something missing and it can take a while until I discovery it. 4. What is your favorite color combination? My favorite are red, pink and their hues. I love when a combo has contrasting colors. 5. Describe your style. I have a romantic style. I often use paints, superimpose elements, chipboards, die-cuts and more.

Little Something Sunday with Wendy Sommers

Spring has Sprung! I don’t know about you, but I am super excited to see the snow gone and the beautiful colors and signs of Spring showing up everywhere! In honour of the change of seasons, I thought it would be fun to inspire you with a colour palette I created to represent Spring. There is a ton of inspiration on many blogs and sites using a mixture of colours to get the creative juices flowing! When using a colour palette or scheme, I try and stick to those colours and only use neutrals to go along with it. So for instance, only adding white, brown, black or kraft to balance out the colour scheme. Here is the colour palette I chose. I think it just screams Spring: And here is the layout I created using the colour palette:


When I created this colour palette, it immediately made me think of these pictures I have of my children. It also reminded me of the beautiful striped paper for Basic Grey’s Hopscotch collection. I paired it with some beautiful teal paper from My Mind’s Eye. Inspiration is everywhere! I’d love to see you give this colour palette a try. Or if you have your own Spring colour palette that you are inspired by, I would love to see that too! Be sure to link back here in the comment section so we can see your beautiful work. You can also come to the message board at www.amillionmemories.ning.com to hang out with us and post your layouts. We’d love to see you there! Happy Sunday! Wendy

AMM Store - Sale

This Week Only!!


Get a free set of Thickers with every $20 purchase.


Get the January, February or March kit for the same price as a three month subscription. That's only 29.95!


Get 10% off the following *New* CHA lines:


Almost everything else in the store is marked 50% off. Just use code SALE3 at checkout.

April Design Team Reveal

I am loving the mix of Lily Bee and Crate Paper in the April kit. The Crate Paper woodgrain paper seems to be a favorite among our design team so I thought I would share LO's featuring that paper today.


"Little Sweetie" by Jennifer Longenecker


"Love" by Marie Ramirez


"My Girl" by Staci Taylor


"My Girl" by Michelle Quinn


"My Girl" by Wendy Sommers

Product Spot Light - My Minds Eye Girly Stamps

Today I want to take a moment to spot light a few LO's from the design team using the fabulous clear stamps included in the March kit. Each kit came with a full set of the My Minds Eye Stella and Rose Gertie Girly Stamps. These stamps feature detailed doily stamps of all sizes. Take a look at how some of our design team members used them. You can use them to make a border or frame for your LO like Staci did on this super cute LO... "You Make My Heart Full" by Staci Taylor

You can stamp them onto a separate sheet of paper and then cut them out and layer them ... "Big Smiles" by Wendy Sommers


"Oh For the Love of Sports" by Jennifer Longenecker Or you can just stamp them straight onto the page as part of the background... "You Are Always Happy" by Wendy Sommers "Partners in Crime" by Jennifer Longenecker "So Happy Together" by Jennifer Longenecker When stamping on my LO's I didn't use ink I used a Versa Mark glue pad and embossing powder. You can also use glitter flocking powder or markers to add color. I hope our design team has inspired you and that you are ready to create with these gorgeous stamps. Don't forget about the design team challenge going on right now. Click here for more details.