Member Monday with Karen Grunberg

Happy Memorial Day and welcome to a new Member Monday. Here to share her selection with us is Karen Grunberg. She chose this layout by Lori Gentile.

"This Mother Sees You" by Lori Gentile


Leave Lori some love on this post and be sure to visit her AMM gallery for more inspiration.

Just as a side note, our regularly scheduled blogging will resume after the design team call.

June Guest Designer Revealed!!

I am so excited to introduce you to our June Guest Designer, Cheryl Ametewee! Over a month ago, I was chatting with Rachel and told her I was in search of some fresh faces and talent to be our Guest Designers. She directed me to the blog of this fantastic designer she followed. I clicked on Cheryl's blog and was so impressed. Her photography of her little ones was so inspiring and I really just loved her style. So I was super excited when she agreed to be our guest designer this month. Look for her creations with the June kit coming soon. In the meantime, have a look below at some samples of her work and read her little bio to get to know her better.


Get To Know Cheryl!
Hi! i'm Cheryl Ametewee and I'm so excited to be the guest designer for AMM this month! I am a stay at home mama to 2 little lovies who we like to call londerpants (19 months) and gracie*belle (3 months) and wife to Nate, my Ghana born prince. We live in DC in an apartment that is always in the middle of some kind of art project...from scrapbooking, to painting, to jewelry designing, there is very rarely a day that goes by when I don't do some kind of art. I currently design for Jenni Bowlin and you can find me on my blog at www.cherylmanz.typepad.com. I am also founder of a new handmade art blog that will go live on June first...come check us out at www.cartwheelsinmymind.com. :)

This layout Cheryl created just for our blog announcement! I love the gorgeous and vibrant color!
"XO"


"Cherish First Home"


"I Love You Gracie"


Please give a big warm AMM welcome to Cheryl! Stay tuned for her designs with the June kit. Be sure to stop by her blog for even more inspiration!

June Kit Sneaks!

Have a peek at our June kit below. This is only a portion of all the fab goodies packed into this kit. It includes new Jenni Bowlin, Webster's, October Afternoon and more. You won't want to miss out on this "Summer Breeze". Look for the full reveal on the 1st. You can sign up for a kit subscription here.


May Challenge Winner!

Congratulations to our May Design Team Challenge winner. Larissa, the hostess of this challenge selected the layout below by Guiseppa Gubler, also known as "seppa" on the boards. Congrats. Guiseppa will win a $10.00 AMM store gift certificate as well as a selection of vintage trims to be shipped with her order.


Look for the June sketch and challenge coming June 1st!

Technique Tuesday with Rachel Hall

Who doesn't have a mess of buttons hoarded in jars in their scrap space? I know I have a ton of buttons. During our National Scrapbook Day Crop, Rachel showed us 7, yes 7 different techniques for creating some handmade flowers for your projects using materials you probably already have lying around. Here is just one of her techniques for using up your button stash. You know you will always find more buttons to hoard to replace them.


This technique was featured during our NSD Crop. You can see the rest of Rachel's flowers here.
Button Flower

Materials Needed:
large brad
buttons
chipboard circle
adhesive

1. Cut a chipboard circle that is slightly larger than the diameter of your brad. Poke hole in the center of the chipboard circle for your brad to go though.

2. Adhere buttons to the outside perimeter of the chipboard circle.


3. Let dry. Place brad through the hole you poked in the chipboard to create the center of your flower.


Wouldn't these look adorable hot glued to a little girl's hair tie or hair clip or even as the center of a larger flower. Have fun playing with different sizes and color combinations. Be sure to check out the rest of Rachel's flower tutorials.

Member Monday with Staci Taylor

Happy Member Monday blog readers! This week's Layout of the Week was chosen by Staci Taylor. She chose the layout below by Tara Orr.

"Wedded Bliss" by Tara Orr

How about getting to know Tara a little better. Read on for a little interview Staci had with Tara.

1. Can you explain the process you used to design this layout? I guess the main inspiration for the project was drawn from the photo itself. I wanted to keep it soft and romantic so I chose the softer peaches and neutral colours that would compliment her skin tone. I fell in love with the die cut from Anna Griffin and knew it was meant for a wedding layout. Lots of layering and distressing of the papers helped to tie in with the whole shabby chic feel.

2. Do you have a favorite color combination to use when scrapping? Hmmm, I don't have a favourite colour combo per se, I tend to be drawn more to the actual paper itself - its pattern, colour, texture, etc. If I totally fall in love with a particular patterned paper I try to match complimentary papers to it and then photos as well. I do tend to be drawn to the more 'washed out' and 'worn' looking types of papers with a comfy sort of feel. Definitely a rustic/vintage kind gal.

3. What is a scrappy item that you could not live without? I love to add flowers to my layouts and really enjoy fussy cutting certain elements within patterned papers but the one item I simply could not do without is my edge scraper - JUST LOVE IT!

4. You mentioned that your layout was a gift for your brother and sister-in-law. What was their reaction when you gave it to them? My sister in law seemed quite pleased with the layout saying, "Wow, you should charge people for this kind of thing - it's so beautiful." (Wouldn't that be nice eh?). My brother in law gave the typical guy response of, "Yea, its nice." ... Um, yea - you're welcome (LOL).

Thanks for the inspiration ladies. Leave Tara some love on this post of on her layout in the gallery by clicking the layout title above.

Little Something Sunday with Staci Taylor

These rolled ribbon and fabric flowers are so popular right now. During our National Scrapbook Day Crop Staci Taylor showed us how to make some from ribbon we all probably have stashed away somewhere.

*The following tutorial was featured on the message boards during our NSD Crop.


All you need is a thicker ribbon (mine is 1.5 inches thick) and a needle and some thread.

Measure your ribbon out to about 24 inches long for a medium sized flower. I call the technique for these flowers "twist and roll." You will be twisting the ribbon first and then rolling it up. So, to start, take a corner of your ribbon and begin twisting it:


Now you will begin the rolling. Holding the end of your twisted sections, start rolling it inwards:


You will continue to twist the ribbon and roll it until you get close to the end:


Once you are near the end, leave a section untwisted that is about the width of your flower:


You are going to tuck this untwisted section under your flower so that the underside of the flower looks like this:


Now, flip your flower back over and grab that needle and thread. Pulling the thread up from the bottom side, you are going to make little stitches through each layer of rolled flower to secure it to that piece underneath. This will keep your ribbon from unrolling and falling apart:


If you have a glue gun, you could probably avoid the whole sewing thing and simply glue the flower together as you roll it up. I do not have a glue gun (shame on me!), so the sewing works just fine for me. When you are done sewing, you will have something that looks like this:
You can really experiment with these flowers! You can experiment with looser versus tighter rolls, and you could also embellish the center with some pearls or rhinestones if you'd like a fancier flower. The sky is the limit!

Manufacturer Spotlight-Cosmo Cricket

Did you know that many manufacturers often sponsor your AMM design team with product to create inspiring layouts and projects? Recently the design team was sponsored with product from all three of the newest Cosmo Cricket lines revealed at CHA in January.

Here is a peek at what some of the design team members created. You can view more of their creations in the Design Gallery here. You can also pick up some of these Cosmo Cricket goodies for yourself by clicking the title of each product line in the body of the post below.

"Handmade" by Stacy Cohen

"A Family is a Patchwork of Love" by Larissa Albernaz


"You Had Me in Stitches" by Kat Glossop


"2 Cute Pals " by Sasha Holloway


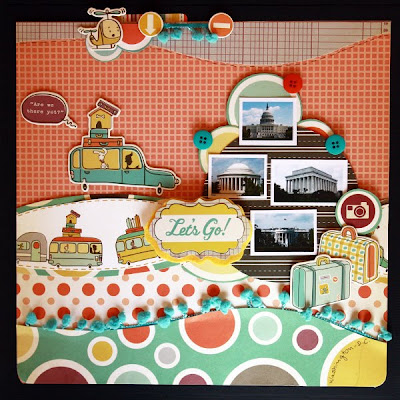
"Let's Go" by Larissa Albernaz


"Little Things" by Kat Glossop


"Staycation" by Jennifer Findlay


"Homegrown Sweetness" by Kat Glossop


"Spring is in Bloom" by Jennifer Findlay

"My First Turkey" by Stacy Cohen


"A Not So Happy 4th" by Tonya Dirk


Be sure to check out what is left of each of these lines before it is all sold out. There are only a couple remaining sheets from each line left. Thanks for stopping by!

More May Design Team Reveal-Off the Page

One of the great things about kits are all the little leftovers. These leftovers are great for card making as Tonya shows us with these fantastic cards. In addition, you already saw the super cute cards that our guest designer, Anabelle O'Malley made.

Tonya said she was channeling her inner Stacy Cohen with the crocheting on this happy birthday card.


I love the stacked Lily Bee chipboard pieces on this blank any occasion card.


I adore the color combination on this thank you card.


This one is just too adorable. Tonya also used up some older kit items with that American Crafts chipboard frame.


Here is a great way to use those October Afternoon Wild Cards. They make great card accents.

And last, but not least is this happy birthday card, which employs the ever popular and trendy banner.


I made a few contributions to some off the page projects with this bookmark using one of the pages from the October Afternoon mini book.


Here I used some scraps to put together a flower inside an old frame I had lying around. It makes for a cute springtime home decor piece. The inside of the frame only measures 3.5x5.

So think outside of the 12x12 box and create something off the page with your kit leftovers.

May Design Team Reveal

How about a peek at what some members of the design team have done with the May kit. This one was a favorite of mine on a long list of favorites. So I thought, in the spirit of favorites, I would show my favorite layouts from what the design team has created so far.

First is this amazing layout from Tonya Dirk. I love the patchwork quilt look she created with the patterned paper with the photo centered in the middle. Such detail!
"Puppy Love" By Tonya Dirk


Of my creations, this one was my favorite mostly because I love the amount of journaling I did and the fun old photos.
"Sweet Summer" by Jennifer Findlay


This one is from Karen Grunberg who has been working on creating a Layout A Day and used her May kit to challenge herself to create one layout each day. She has also made a really fun departure from her usual style and is really loving using bright colors lately. Luckily this kit is full of bright colors.
"Don't Touch" by Karen Grunberg


And last but not least is this beauty from Larissa Albernaz. I really love the grid pattern she created with the punched paper squares.
"Sweet Sumer" by Larissa Albernaz


The rest of the design team is still working on some inspiration for you, so stay tuned here to the blog for more reveal. Or if you just can't wait, have a peek at the Design Gallery here.

Technique Tuesday with Rachel Hall

Homemade Mini Album
Today I am offering a quick and easy mini class on making a portfolio style mini album from scratch. Enjoy!


Materials Used:
Wood Paper (if you don't have access to this paper by Creative Imaginations, you can use any thick cardstock),
double sided patterned paper,
cardstock,
trim/twine,
embellishments/ephemera,
permanent adhesive (I prefer fabritac),
office portfolio clip
I used the Girls Paperie On Holiday line which can be found here.

Instructions:
Cut your wood paper, or cardstock if that is what you're using, to 8.5"x5.5"

Cut a piece of patterned paper 8.5"x5.5" and adhere to the back of the wood paper or cardstock using a permanent adhesive. Let dry and then fold in half making a 4.25"x5.5" booklet.


Embellish cover as desired or as shown. For my cover I used a 5"x3" piece (red dot), 4"x3" piece (floral pattern) and a strip of a decorative edged piece roughly 2" wide. Sand/distress/ink edges of papers if desired. I wrapped this decorative edge piece completely around my album. Add trim and embellishments of your choice.


Open up booklet and using your office portfolio clip, mark where you need holes punched and punch them.


Using 3 different double sided patterned papers, cut pieces in the following measurements:
6"x3.75"
5"x3.75"
4"x3.75"
Score along the bottom 1" from edge and fold that piece up. Use a border punch on a couple or all of the folded up edge if desired. I used a scallop border on the largest and smallest pieces. Sand/distress/ink edges of papers if desired. Adhere folded piece in place.

Score .5" from the top to create a booklet that is easy to flip. Adhere each piece on top of the last.


Adhere booklet in place. Using cropadile or hole punch, punch holes for the portfolio clip.Place clip through booklet and secure. Paint/sand/distress clip if desired.


Embellish pages as desired. In my book I used small gatherings of vintage postage stamps, decorative brads and punched circles of patterned paper. Add small photo mats with cardstock. In my book they measure:
page 1- 1.25"x1.5"
page 2- 1.5"x1.75" and 2"x2.5"
page 3- 2.5"x3.25"


Add your photos and journaling.


Add a piece of jute twine to hold your booklet together.