

Technique Tuesday - Photoshop Tips by Karen Grunberg
Making a Photo Collage
As many of you know, I spent the whole month of December making plans with my son and husband and taking lots of photos so I could create a daily album. In the month of December alone, I took over 6000 photos. Now that the month has come and gone, I have a beautiful minibook full of all of our memories. Even though, I love my book, I also wanted to have a layout that I could put in my album and be able to capture the feeling of this wonderful December.
As I just mentioned, I took a lot of photos, so choosing one over the others wasn't going to be an easy feat. After pondering for a while, I decided that I didn't have to choose one; I was going to create a photo collage of some of my favorite photos that have the strongest memories.
I knew I wanted the collage to be an 8x8 so it could fit into a 12x12 page with some room for a title, etc. I didn't want each of the photos to be too tiny so that meant they'd be 2x2 so a little bit of quick math told me that I'd be able to fit 16 photos in my collage. I went through my photos and chose the 16 that I thought was the best representation of our 31 days and opened them all up in Photoshop. (I use Adobe Photoshop but these steps should work without a problem in Photoshop Elements, too.)
Then I opened a new document and set the size to be 8 inches by 8 inches with 300 Resolution. 300 is about the right resolution for a crisp, clean photo to print. For the web, you don't need anything higher than 150, but if you're printing a photo, I recommend 300.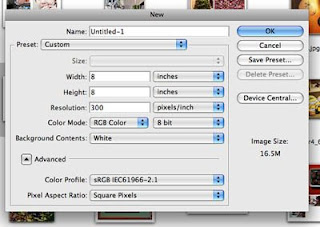
Now I had 17 photos open. 16 that will go into my collage and the one 8x8 that will be my collage. I then clicked on one of the photos I planned to put in my collage and chose the crop tool from the Tools list.

Now I had 17 photos open. 16 that will go into my collage and the one 8x8 that will be my collage. I then clicked on one of the photos I planned to put in my collage and chose the crop tool from the Tools list.

This tool allows you to select a certain portion of the photo and "crop" it out so that only that section becomes the full photo. It also allows you to predefine a size for this selection. I set mine to be 2 inches wide and 2 inches tall with a resolution of 300.
 I clicked on my photo and dragged the my mouse till I had the section selected. You'll see that the crop tool highlights the section it will crop out and grays over the rest of the photo.
 Once you've selected the area, you double click, and it will crop out exactly that section and it will be exactly 2inches by 2 inches. After that you can copy the new square over to our empty 8x8 document and put it wherever in the collage you want it to go. You do the exact same thing to all the other 15 images and one by one build your new collage. Once the collage is complete, you can then print it out and you're ready to begin scrapping.
Here's how my layout turned out:
 After I printed the collage, I glued it to a piece of 9x9 paper. I used Pink Paislee Tinsel Town. I then glued that paper to a 10x10 paper for which I used the backside of Making Memories Rouge. I distressed the edges of both papers before I glued them. And then I glued the 10x10 to another piece of Making Memories paper. This time I used the beautiful Varnished Vine from the Greenhouse collection . I stitched on the edges of the 9x9 and the 10x10 paper with black thread three times and using my fingers, picked up the distressed edges even more just to give it some dimension. I then stitched around the 12x12 paper one time just to give it all a framed look.
Finally, I added some Pink Paislee stickers to write out December and some tiny alphabets to write out the rest of my title.
And voila! we're done. It's a simple layout but it carries all my memories from December and I can turn to my minibook for all the detailed journaling.
1 comment:
thanks for inspiration karen!
Post a Comment