Meet Wendy Sommers

Wendy is one of the newest members of the A Million Memories Design Team.

Here is a quick bio on this talented, sweet
and massively creative lady:

Hi. My name is Wendy Sommers and I live in Ottawa, Ontario, Canada with my husband Joe and our two children – Brendan and Olivia. I have been scrapbooking for six years now. However it feels like it was just yesterday that I fell in love with this wonderful hobby. My family is the inspiration for most of my layouts. I love to capture the everyday moments of our lives and create pages that will be wonderful memories to reflect on in the future. Photography is also a passion, and for me, a great photo is the start of a great layout! My layouts have been published in Scrapbook & Cards Today and Canadian Scrapbooker magazines. My scrapbooking style usually includes many layers, lots of inking and misting, and bright colors. I am honored to be asked to be part of the amazing A Million Memories design team. I look forward to inspiring others and learning from all you.

I pulled some layouts from Wendy's blog to share with you so you can see what a wonderful artist that she is.

We have more details on our team to share with you. We have such a talented bunch and we are eager to share more about them and their art. Stay tuned for more!


Scrap Space Solutions with Jennifer Longenecker

Hey all it's me again. It's my turn to share some more of my scrap space with you. I've spent a lot of time working in my scrap room this weekend getting it cleaned up and somewhat organized. I did take pictures of everything although most of the pictures turned out kind of crappy. Today I want to focus on my scrap desk. It is my favorite thing in my scrap room because I designed it and my daddy helped me build it. Take a look.


The top is made from reclaimed pallet boards, the legs are 4x4's and the brace is made from 2x4's. As you can see there's a spot where I can add a shelf to the bottom of the table if I ever need some more storage space. I still need to paint the legs of the table, but I'm going to leave the top as is. I may put a clear sealant on it though to protect the wood.

On my desk I have my Making Memories self healing mat, a 1940's colander to hold all my embroidery threads, a pic of my momma and daddy, my Making Memories carousel for my most used tools finally and my two paper trimmers. I want to find a wire basket that is wide enough to hold 12x12 sheets of paper so I can keep the contents of the most current A Million Memories kits close at hand but not strewn about my workspace.

The chair I found at an antique store. It's not an antique, but I loved the look of it and for $15 I couldn't pass it up. I spray painted it to match my other accents and then I carved out a heart and put hubby's and my initials inside and our wedding date beside the heart.

Little Something Sunday with Ro Philippsen

One of the most amazing gifts I usually give my friends are books. I think books are for all life, you read and never forget. I love books. Today I'll show you how to make an easy book page marker. Then, the next time you give a book as a gift you can do this book page marker with the book. It's a sweet courtesy.


You’ll need:
- a paper strip (1,75 x 11 inch)
- magnet adhesive sheet (small piece)
- corner rounder punch
- some embellishments


First, fold the paper strip in half.


Round the corners.


And glue the adhesive magnet.


Now you’ll just need to add some embellishments.

AMM Store - What's New

There are three new lines from Crate Paper that are available for pre-order. These lines are fantastic and I know you won't want to miss out on any of them.
Emma's Shoppe
Neighborhood
Portrait

February Design Team Reveal

Our design team has been busy working with the awesome February kit. Let's take a little peek at what they have been up to.

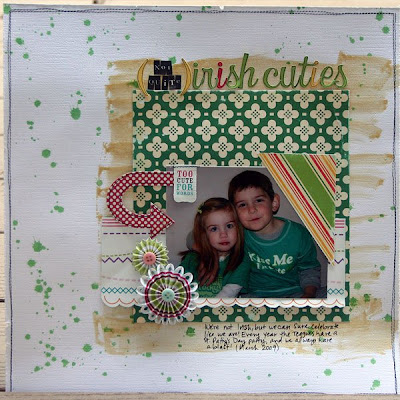
"Irish Cuties" by Staci Taylor


"Day 4 Love" by Marie Ramirez

"All I Want for Christmas" by Jennifer Longenecker

"You Bring Laughter to My Life" by Jennifer Longenecker

February Design Team Challenge Update

Our February challenge has drawn to a close. I want to thank all of you who participated. It's always fun to look at all of your creations. Let's take a quick look at the challenge.

The challenge was to create a LO based on Marie's sketch below and to use numbers or letters to create the frame.

Here's the sketch:

And here are your contributions:

Mayumi

Jennie
Anet

Somehow I missed posting this LO by Dawn. Thanks so much Dawn for letting me know. Great LO too. I love how you combined the title with the numbers within the frame.

"Winter, Spring, Summer, Fall" by Dawn

and the winner is .............. Mayumi!

I just loved her precious LO and those cute little clouds with the heart raindrops were just too cute. Congratulations Mayumi. Thanks again to everyone who played along. Our next challenge will be posted soon, so keep an eye out.

Technique Tuesday with Jennifer Longenecker

Today I've got a LO how-to that I am going to share with you.

Gather your supplies:
Basic Grey Ambrosia Stickers
Pink Paislee Fascinating Entrhalling PP
Pink Paislee Enchanting Sticker Book Alpha Stickers
Pink Paislee Captivating Alphabet Stickers
Prima Flowers Bonnet Bloom
Orange Scallop Velvet Trim
Creative Imaginations Flower Brad
Basic Grey Buttons
White Tissue Paper

1. Cut your trim to match the length and width of your photo. You'll need two pieces that match the width and two that match the length.

2. Glue the trim to the back of the photo so that about half of the trim is still visible from the front.


3. Determine the position for your photo and then glue your tissue accordion style so that it will mat your picture.


4. Adhere your photo over the tissue paper mat making sure it mats the left side of your photo.
5. Add the first word of your title to the bottom left hand corner of your photo.

6. Using your scissors make small slits in the tissue paper mat to create a fringe around the photo.
7. Add the second word of your title just below the bottom left hand corner of your photo making sure that your first word fits inside the width of your second word. Add a small button to the right of your first word.
8. Add a Prima Bonnet Blossom to the bottom right hand corner of your photo. Add the orange Ambrosia swirl behind the flower making sure to allow part of the swirl to rest on top of your flower. Add a button to the swirl.
9. Distress the edges of your LO. Use the reveal technique near to top right hand side of your LO. As you are distressing, make a larger tear near the top right. Find a piece of coordinating scrap paper and add a rubon to the edge. Distress the edge of your scrap and adhere to the back of your LO so that it shows through the tear you created earlier.
10. Add a flower brad to the middle of the tear and fold back the sides of the tear.
11. Place your journaling above the right hand side of your photo. Add a button to the bottom left hand side of your journaling.

Scrap Space Solutions with Jennifer Longenecker

I have been working hard in my scrap room and had fully planned on taking pictures and sharing them with you today, but my camera battery charger died, and I didn't get my new one in until it was time to head out of town. Luckily, I had taken a few pics of my embellie storage a few weeks ago, so I'll share that with you today.

I have tried many ways to organize my embellies, but I have found that organizing them by color works best for me. I have several containers in which I do this. I've got three paper mache boxes that look like books, 3 circle paper mache containers, which I plan on decorating like a cake. I've got two vintage looking lunch boxes and 4 photo boxes. I am planning on replacing the photo boxes with something else sometime soon, but for now they work for me.

Below are the paper mache book boxes.

The other thing I love about these boxes is that every time I open them I feel like I've just found a treasure in grandma's attic.

Little Something Sunday with Ro Philippsen

First, I tore out a page from my appointment book from last year. The page where the 2011 calendar was. Then I took a mini chipboard album piece I found in my scrap box.


I then took six canvas circles and cut them in a spiral shape.


I rolled up each spiral until I got the shape of a flower, and glued on the center. Then, I sprayed some glimmer, and the flowers were ready.


I adhered the calendar on the chipboard piece.


Next I glue my canvas flowers and some handcut paper flowers to embellish my calendar.


Finally I glued a little strip of paper to the top and added the year.Add a bow, and here it is my cute and very simply desk calendar!