August Guest Designer Layouts!

This month our guest designer was Lisa Dickinson. I have always loved her clean and graphic style and she did not disappoint as you can see in these layouts made using the August A Million Memories kit. These are two of her fantastic designs. Have a look below!

"Explore" by Lisa Dickinson
I had fun mixing up some of the kit's letter stickers and stitching them in place! The compass was cut from the Webster's Pages pattern.

"Together" by Lisa Dickinson
I wanted to do something similar to the wedding ring quilt pattern for this page since it is about our 12th anniversary. I used lots of little circles + the Girl's Paperie flowers to create the design. The title is handcut from the font Fling.


I'll be back tomorrow to share the other two stunning layouts she created. Be sure to stop by the Design Gallery and see what the design team did with the kit and stop by Lisa's blog to say hi and leave some AMM love!

Technique Tuesday with Larissa Albernaz

Inspiration!
Today I’m going to demonstrate a layout whose design was inspired by a board game, Monopoly.

I love searching for different designs and the board game themes, their little cards, dies, card decks, dominos and little pieces inspire me a lot! I also like grids. It was easy to start from that idea and make a layout with the papers from the collection “A Walk in the Park” by Echo Park.
All you are going to need to do is imitate the board game, saving 2 inches of border from the sides of the page for the collage of little paper squares. Next, in the center, position a 7x7 inch square and to it add the elements from the board game.

Prepare the other elements you need to mimic the board game. You can cut and glue pieces to reproduce this idea.


Now, puncture the paper and embroider it using stitching

Incorporate it onto your page the way I did and then add the picture, decorating it with paper cut outs, felt and whatever else your imagination allows.

Member Monday with Kat Glossop

Here with a new Member Monday inspiration is Kat Glossop. Kat chose the layout below by Michelle, also known as "mommy5x" on the message boards. Kat said, "It's so textured and the colors are beautiful."

"Son Flower"

Here is a little interview Kat did with Michelle to help us get to know her a little better.
1. First up, can you tell us a bit about yourself? I am a mother of 5 wild, magnificent children. I have a huge passion for photography and scrapbooking and my children are my inspiration for both.

2. This page is stunningly beautiful, and those flowers are perfect, it made me wonder which came first? The photo or the flowers? And which do you normally begin with (ie. Photos or products) I took this photo last year of my 2 younger boys and finally found the Prima vine that I was looking for. Most of my layouts are inspired first by the photo.....but one of my worst habits is that I love to scrap the newer photos and forget about the older ones. I will admit though there are certain products that get my mojo going before the photo does.

3. The photo is equally stunning, where was it taken? This photo was taken in behind our home. We live on a farm and I am very fortunate to have an endless area to photograph.

4. Sneaking a peak over at your blog I've noticed you have a lot of texture on your pages, do you have any tips/tricks for making your pages jump off the screen? I love to ink everything....I find it adds a dimension to the paper and layout....I also love lots and lots of layers and colors. One of the photo editing tips that I can give you is something that I always do is to add extra black balance. I find this makes little detail makes the photo pop.


Thanks girls!

Little Something Sunday with Kay Rogers

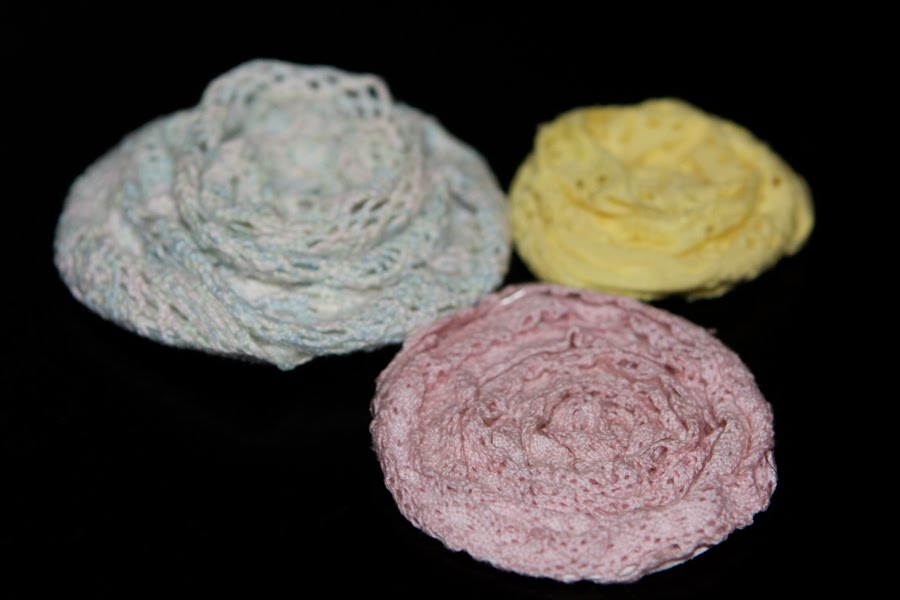
First, I put thin double-stick tape on the edge of the trim. I also punched out some circles from cardstock to use as the base.


I then started the flower in the center, removing the cover to the tape.

You twist the trim around the center, removing the adhesive backing as you go.

As you get to the end, make sure you cover the edges of the circle with the
trim.

I made three flowers in different sizes from the trim in this month's kit.


I decided to make it a pin for clothing, so I glued the flowers onto a piece of
felt using Fabri-Tac

I trimmed the back of the felt, and glued on a clip on the back.
Here's my girl, wearing the pin. She tied the bow and attached it to the clip.

Design Team Reveal-The Monthly Sketch

There are a couple more days to get your layout entered into the monthly design team challenge. To help inspire you, we are going to take a peek at what the design team did with the sketch and kit.

It seems that the sketch designed by Zoe Nemburt was so great as is that most of the design team took the sketch pretty literally.

First is this layout by Tonya Dirk with those adorable out takes photos.


Next is this whimsical layout by Larissa Albernaz. I love how she replaced a photo with some embellishments. (Some items used here are not included in the kit)


Next is this beauty by Kay Rogers. The dark cardstock really makes the colors on this one pop. She also changed things up a bit from the sketch to use just one photo.


And lastly, is my contribution. I followed Kay's lead with just the one photo.


You can see more o what the design team did with the kit in the Design Gallery here. You can sign up for a kit subscription so you don't miss out on the awesome new CHA products that will be coming soon.
Get your layout posted to the challenge thread here by midnight on the 21st so you can be entered to win!

Challenge Reminder

Just a quick reminder that you need to get your layout posted to the challenge thread and posted in the gallery to be entered to win the awesome prize, a $10 AMM store gift certificate and a selection of AMM vintage trims to be shipped with your order! With all the fun CHA stuff coming in in the next couple of months, that money coud sure come in handy!

So here are the challenge details one more time: Create a layout based on the sketch below and make your layout about an inside joke you share with someone else and be sure to post it by midnight on the 21st!

I'll be back tomorrow to show you what the design team did with the sketch!

Technique Tuesday with Carole Janson

Creating Fun Embellishments, Borders, and Other Accents from Dramatic Pattern Paper


Cut out the circle shape as shown in the below photo.


Then cut the outside arch shapes from around the outside of the circle shape as shown in the below photo.


Then add these arch shape to the bottom of the layout, which creates a fun border, as shown in the below photo.


You can then use the rest of the circle by adding some fun stickers etc., and creating the shape into a pretty flower which you can then add to your layout with some dimensional foam dots.


You could cut out as many of these flower shapes as you like and layer them through your layout. It is a great way to utilise your pattern papers or left over pieces which you may have in your stash; no wastage.

Here is the finished layout.


I hope you enjoyed this quick tutorial.

Member Monday with Zoe Nemburt

It's a new week and that calls for some new inspiration. This week's Layout of the Week was chosen by Zoe Nemburt. She chose the layout below by AMM Newbie, Tara Orr.

Zoe said, "Each and every day we have so many beautiful works of art uploaded to the A Million Memories Gallery, this week this layout by Tara Orr just stood out to me, the softness and shabby chic style is absolutely stunning. Congrats Tara for being our Layout of the Week."

"Baby Doll" by Tara Orr


So we asked Tara a few questions so we can get to know her a little better.
1) Tell us a bit about yourself. What got you started in scrapbooking?
My name is Tara Orr and I'm a wife and mom to 3 amazing kids. I started scrapping in the fall of 2008 while trying to create a keepsake book for my oldest son. After creating my first 'real layout' I was completely hooked! My kids play a huge part in my inspiration.

2) What three supplies would you not scrap without?
Love all sorts of patterned papers - especially the ones with fantastic fussy cutting options. As of late, crochet doilies are a huge hit with me as well - love the texture and vintage feel they provide. I couldn't see myself creating a layout without my edge scraper - to me, everything looks better distressed - LOL!

3) What is your favorite part about scrapbooking?
Its a great stress release for me. Its my down time once the kids are in bed for the night - my quiet time. I'll sit with my glass of wine and just drool over the gorgeous products I am fortunate enough to work with.

4) What are your favorite products and manufacturers?
Have to say blooms and bling for sure! I'm slightly biast as I work for ZVA and Petaloo but I honestly find it difficult to do a layout without one or the other! (so glad I have a girl to scrap...) Also love Graphic 45 and the latest releases from My Mind's Eye, Pink Paislee, anything with a shabby/chic/vintage vibe.

Thank you Tara for sharing your beautiful work with us.

Little Something Sunday with Larissa Albernaz

I love working with Styrofoam and making little sceneries that transport me to the time where my mother prepared all the decorations for my birthday parties. My projects turn into small ornaments and toys which my daughter has fun with and that, during the creative process, have for me the same power as a scrapbooking page. They take me go back in time and recall a time of enchantments!


1. To make this project I cut out a, at least, one inch (thickness) rectangular Styrofoam piece.


2. Next, I cut out all my ornamental elements from the paper used as base (grass) and the ones that would cover my house.

3. For this piece, you can use a birdhouse template to do the little house. All you have to do is print the template, trace it on the back of Crate Paper patterned paper, fold the dotted lines and glue them.
4. Line the Styrofoam with hot glue and assemble the little house.
5. For the dolls pole setting, just glue a piece of toothpick to the back of the paper, making a hole in the desired Styrofoam base area, decorating as you wish.

The finished product!!