Technique Tuesday with Wendela Lam!

Fences are hot!
How cute are is the tiny fence in the June kit?!!! I really love them! Last weekend here in Hellevoetsluis, the place where I live in the Netherlands, I saw this fence in a garden.

And it was so inspiring to make a fence by my own! The only things you need are little wooden sticks and iron wire.

I saw the wooden sticks at McDonalds, for eating ice cream…..:) and I cut them in half.
Next you cut off 2 lengths of the iron wire, approximately 12 inches. Twist the beginning together like this.
Add a wooden stick between the iron wires….one wire on the upper side and one on the under side.

And twist together again.

Do the same thing on the upper side, to make the fence more stable.
Your fence is finished and ready to scrap on your layout! And if you like, you can paint it a favorite color. Have fun, and I would love to see your work with the handmade fences in the gallery!

Member Monday!!

Today Corien brings us a new Member Monday with a layout she chose by Elaine DK.

Surf Adventure

Corien chose this layout because she, "loves the painted and crackled background with the fishing net."

If you want to see more from Elaine check out her gallery here and be sure to leave her some love on this layout by clicking here. Stop by tomorrow for a Technique Tuesday with Wendela.

Little Something Sunday with Mia Caniza!

Here's a quick and simple card I created using the Pink Paislee Enchanting line.

INSTRUCTIONS:

1) Cut a sheet of 8.5x11 kraft cardstock in half horizontally then fold in the middle to get 5 1/2" x 4 1/4" card.

2) Cut out a piece from the Pink Paislee Enchanting Adorable paper measuring 5 1/8" x 3 7/8". Distress the edges with your edge distresser.


3) Adhere the paper to the base of the card, centering it while you do so. If you want, break out your sewing machine and stitch a border on the paper. I did two passes for a funky sewed border.


4) Take the green and pink border sticker from the Pink Paislee Enchanting Sticker Book and adhere it to the bottom fourth of the card with the fancy border edge facing upwards. Trim off the excess.


5) Take the striped border sticker, also from the same sticker book, and place it on top of the first border sticker, overlapping it a bit onto the first sticker border. The fancy edge will be facing downwards on this.


6) Pick out a foliage chipboard shape from the Pink Paislee Enchanting Chipboard Elements set. Adhere piece to the left hand side of the card.


7) Poke a hole in the center of the bud with a paper piercer. Take a velvet brad from the Pink Paislee Enchanting brads and place in the hole in the chipboard.


8) Add a sentiment using the Pink Paislee Fashion Script Alphabet Stickers on the lower right hand side of the card over the border stickers.


9) Since I wanted the sentiment to pop and also give it some dimension, I filled it in with Stickles for an added shimmer, thus also changing the color of the alphabet.


All that's left now is to write a note inside and send it off to someone special. You can find some of these Pink Paislee Enchanting products at A Million Memories. You can find them in the store here.

More "Early Bird"! Manufacturer Sponsor Spotlight!

Today I am going to share some more projects the design team created using the new "Early Bird" line from Cosmo Cricket.

For You Gift Card Holder & Envelope by Jennifer Findlay
I found the pattern for both on the 2peas site but an Internet search would also pull up some great envelope templates.

Chicks Dig Me by Susan Dupre
I really love the flowers on here with the patterned paper stems and leaves.

The Two of Us by Lucy Edson
I love all the journal spots on this layout and the adorable picture.

Young Love by Rachel Hall
First, I love how Rachel displays her layouts for photographing and second I love the layers here with the old school pics.

Happy by Hilde Janbroers
I love Hilde's hand stitching border and the bracket shape here.

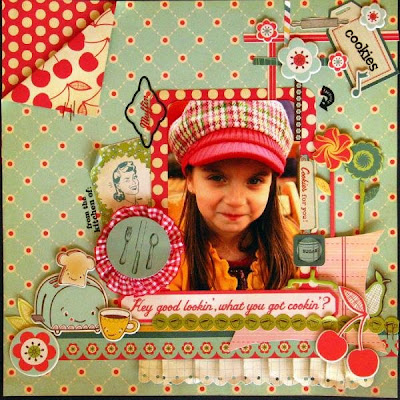
Hey Good Lookin' By Larissa Albernaz
I love all the clusters of embellishments on this one, and the pic is so adorable!

We (heart) Grandpa by Stacy Cohen
The detail work Stacy put into embellishing the ribbon paper is outstanding!

If you want to see more of what the design team did with these new papers and embellishments, check out the design gallery here. want some "Early Bird" of your own, then be sure to check out the shop here, especially now with the 25% off sale going on. Just enter 2122 at checkout!

See you tomorrow with a Little Something Sunday from Mia, who brings us a really pretty card.

July Kit Sneek!!!

The July kit is so awesome!! We have had some fun on the boards with Mia, who designed this month's kit, playing a little guessing game. Here is a sneek at what has been guessed at so far. AMM will be one of the first, if not THE first, to have Basic Grey's Lemonade line in their monthly kit!! You don't want to miss this one at all!


You can keep track of the game and see what else is added to the kit by watching and guessing on this thread here. I can't wait to see the full reveal or to see what Christine Middlecamp does with it!!

Spotlight on Cosmo Cricket "Early Bird"

The design team was luck enough to get sponsored by Cosmo Cricket this month featuring their brand new "Early Bird" line, which is so full of cuteness and pretty summer colors. Have a look at the great layouts the design team came up with and see just how different each style is using the same line of papers.

Greet the Day by Larissa Albernaz I love Larissa's clustering of all the embellishments, and the different sized photos on the same layout.

Don't Worry Be Happy by Susan Dupre I love Susan's patchwork heart! So cute!


Bakin' Cookies by Stacy Cohen I really like how Stacy arranged the photos across the center of the page.

You Greet the Day with a Song by Rachel Hall Those pinwheels are to die for on this!

Love Smile by Hilde Janbroers I love the scalloped circle page and Hilde's misting.
Dolly by Jennifer Findlay I love this picture of my little dog and I tend to leave a lot of white space and cluster my picture in embellishments in one area.

We'd love to see what you some up with using the new Cosmo Cricket "Early Bird" line so be sure to upload those projects to the gallery.
You can see more of what the design team did with the papers here. Want some for yourself?? Click here!!

July Guest Designer Reveal

This month we have the uber talented Christine Middlecamp as our July Guest Designer. If you are not familiar with her work you are for sure missing out! Here is a little bit more about her.

Bio:
Christine lives in South Saint Paul, Minnesota with her young son Ethan. She's been scrapbooking for over three years and has played multiple roles in the scrapbook industry both as a designer and teacher. Christine designs for Crate Paper & Sassafras. In the past, she's designed for Prima Marketing, October Afternoon, and Studio Calico. She's also guest designed for various online venues. She hosts a well-established blog, "Retrospection", where she shares her latest work and routinely writes small tutorials for ongoing projects. Christine's work is very detail oriented. She has a passion for embellishments and texture. By combining funky unique scrapbook items, Christine creates beautifully layered scrapbook layouts that keep the eye moving around the page. Her work is highly ornate with an edge of playfulness and elegance combined. No detail is ever left behind.
Here are a few of Christine's favorite layouts, and mine I must add!
"Almost Two"
"So Tweet"
"Us"
Thanks so much for joining us this month Christine! I'll be back after the kit debuts to share Christine's designs with you as well as those of the design team, so hang tight!

Technique Tuesday With Mia Caniza

Have extra transparencies lying around? Ever wanted to give your transparencies dimension? Or have you ever wanted to replicate those Lollipop flowers but with a funky feel to them? Well, look no further.


Materials:

-Leftover transparencies, preferably thicker ones (I prefer the Hambly ones)
-A heat gun
-3 sizes of circle punches (I used ones that differed by ½” each)
-Tweezers
-Craft mat
-Craft pick
-Brad
-Stickles, optional
-Gesso or white paint, optional

Instructions:

Decide on which transparency designs you would like to use per flower and what order you want them in. Once you have chosen, take your 3 punches and punch out a circle per punch size for each flower you want to make.

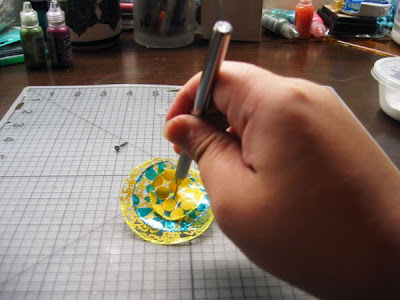
Pick up your largest punched circle with your tweezers and heat it up with the heat gun. Don’t mind it if the color changes a bit, you just don’t want it to burn. Apply heat to different parts of the circle making sure to get it pliable so it curls up in some areas. Work with it until you get a curled shaped to your liking. Be careful not to burn yourself. Set aside to cool.

You will want to do the same to the other 2 circles. This time you want to try and work with the transparency so that the way it curves fits into the first circle. Play with it a bit, twisting it until you get it to “fit”. Set it aside to cool. It is also at this point, once it cools, should you wish to paint the back or add glitter to the edges to do so here.

Take your circles and layer them on top of each other making sure they fit into each other.

Take your paper piercer and carefully poke a hole through the center of your flower.

In order to insert the brad through the entire flower you will have to do it circle by circle since the transparency has hardened. That way you can also play with it to your liking and arrange it how you want it.

Here you have the finished flower.

Here are 3 different transparency flowers to show you the different options and ideas you can create with this technique.

Thanks so much Mia. I am for sure going to give these a try. And if you use Mia's idea, link us up in the comments here. We would love to see how you use these great hand made embellishments.

Member Monday with Rachel Hall

Today's Layout of the Week comes to us from Diana, known as DianaRita on the boards, chosen by Rachel.

Here is what Rachel had to say about selecting this layout: "This layout really stood out to me in the gallery for many reasons. I was instantly drawn to the pleated and gathered paper that was used to create the curtain effect around a perfectly silhouetted photo. The embellishments used perfectly enhance without detracting from the design. The dark background is the perfect choice for the lighter papers that give a truly classy and beautiful effect. This is a perfect example of a truly beautiful performance based layout that is truly unique!"

Here is Diana's layout and what her inspiration was. "I did this one for a challenge at ScrapppingMojo. I got the idea of the curtains from one of the ladies there. Her work is amazing."

"Ballerina" by DianaRita

You can view more of DianaRita's gallery here and go leave her some love on this layout by clicking here.

Little Something Sunday with Corien vd Oever!

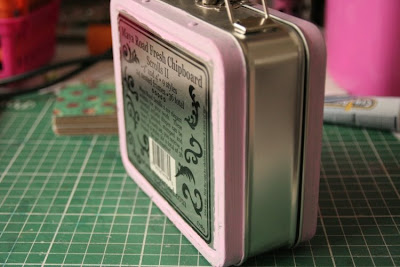
Altered Maya Road Tin
1. Take a metallic basket from Maya Road and paint the corners with acrylic paint.

2. Take the handle off and decorate with lace all around.

3. Put the handle back on and glue some little roses on the sides. Then decorate the front with lace, thickers, and flowers.
4. On the back, I put some papers, flowers, and a chipboard swirl. I painted the swirl first and then put it through the Cuttlebug.
5. Decorate the handle with lots of lace and ribbon.
I made a little mini book to go with it.
Thanks for Sharing Corien. Come back tomorrow for another Member Monday.