Member Monday with Karen Grunberg

Today's Layout of the Week was picked by Karen Grunberg. She chose this beautiful altered frame by Karla Smith. Her frame is based on Lucy Edson's Shadow Box, for the Crop at Websters.

Here is what Karla had to say about her project. "I took a vintage chalkware (Plaster) frame with cherubs all over. Sprayed it with mists, then covered in mica flakes. Using my Boskut Cutter I cut the poinsettia flowers. Thanks for the fun project Lucy!!!"

"Believe" by Karla Smith


Karen said, "Altering projects is always challenging for me and the holidays are my favorite time of year so when I saw this beautiful frame, I instantly fell in love."

Read a little interview below that Karen had with Karla.

1. How long have you been scrapbooking? I started scrapbooking in the Mid 90's with CM, however I really didn't get crazy with it until the end of 2006. It has been non- stop since I found AMM. Which is was my first online Kit club and have fallen in love here.

2. What's your favorite subject to scrap? My Granddaughter is my favorite subject to scrap. I want to capture all those special moments as she grows up. I wish I had done this while my kids were young.

3. What's your favorite style of scrapping? Vintage style for sure, when I am not Scrapping my DGD. Antiques have always been my hobby/ business, So anytime I can do a vintage page, or altered project, I get completely involved. This last year, I have found I love adding a shabby flair to the vintage pages. which has come from all the international inspiration here at AMM.

4. Is there anything you wish you did more of with your scrap pages? Yes. I need to journal much more.

5. Is there anything you do on almost every page? I would say layers. I have come to love a chunky page.

6. Please share your blog link with us. http://karlysmith.typepad.com/ LOL! Oh Dear! My blog needs a good catch-up.

Leave Karla some love here on this post or directly on her project in the gallery here. You can get more inspiration from Karla's gallery here.

Little Something Sunday with Stacy Cohen

This is the time of year when we give thanks for all of our blessings. It reminds us to show gratitude . . . not just at Thanksgiving time, but throughout the year as well.

I personally am a big fan of handwritten thank you cards and I often send them to show my appreciation when someone has done something nice. In a time when it’s so easy to send a quick email or leave a voicemail message, I think a handwritten note is extra special. And when that “thank you” message is handwritten on a handmade card, it can really make someone’s day. Here are a couple of thank you cards I made:


So the next time someone does something nice for you -- even if it’s just a little thing -- sit down and write them a thank you note. I bet it will put a smile on his or her face!

Manufacturer Spotlight on American Crafts

This weekend we are highlighting the super cute papers from American Crafts "Blue Skies" line. American Crafts sponsored the design team last month at our crop and sent along these cute papers and some embellishments to work with. Here are a just a few of the layouts some of the design team came up with.

"Cubby Crazies" by Kat Glossop I really love Kat's color combo here and her doodled border.


"Chef Boy r' Lisa" by Jennifer Findlay I used a sketch from 52 Sketches 52 Weeks for this layout.


"Swim" by Lucy Edson Lucy created this layout for Staci Taylor's Inchie challenge during the crop. I love the scattered bling and the Flair she added to this layout.


"Sweet n' Sassy" by Rachel Hall I love the crumpling of the paper Rachel did here and the frames she used, which were also available in the November kit. So cute!

You can check out more projects using the American Crafts "Blue Skies" line in the Design Gallery here. Look for more projects from the rest of the designers coming soon.

More December Sneaks

Here are a couple more sneaks of the December kit for you! Hope you all had a great Thanksgiving and are enjoying your Black Friday shopping if you are out. Stay safe!!

If you want to preorder this kit you can purchase it here or sign up for a subscription.
A Million Memories also has some great Black Friday deals. Plus You can take 20% off your order when you enter the code 444 at checkout. This does not apply to monthly kits however. PLus US orders over 40 dollars can also receive FREE shipping. So go get shopping!!

November Design Team Reveal-The Sketch

A Million Memories has a new monthly feature! A sketch to help jump start you creativity with the kit will be posted on the Monthly Kit Board every month along with samples created by the design team. You are welcome to use whatever product you want with the sketch and post it on the thread or in the gallery.

So here is the sketch for November designed by Rachel Hall.

And here are the takes of the design team on the sketch.
Rachel Hall "Muah!" Could Roslyn be any stinkin cuter. I love how Rachel used the frames from the kit.


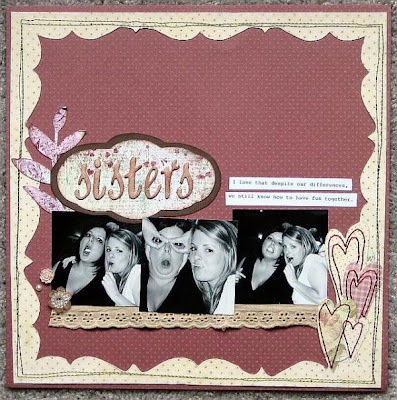
Jennifer Findlay "Sisters" I omitted the larger photo because I didn't have one and replaced that with the title block.


Stacy Cohen "Us" I love the pink tulle at the top of the ripped section. Stacy adapted the sketch to work with her photos by omitting one of the smaller ones and replacing it with a title block.


Tonya Dirk takes the cake for creative adaptation of the sketch by applying it to these really pretty cards. Gorgeous work!
Look for a new sketch with next month's kit and check out more of what the design team did with the November kit here.

Gallery Trends

As I was browsing through the gallery this morning, I spotted a bit of a trend. I am seeing lots of inspiring Christmas and winter themed decorations and it is really putting me in the mood. So let's take a look at some of these projects by some of our designers and members.

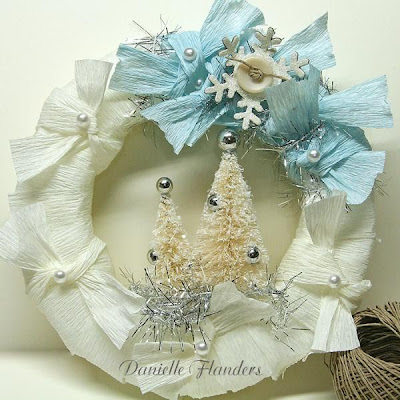
First I noticed a few really beautiful wreaths. Like this first one by Danielle Flanders wrapped entirely with crepe paper. So pretty! You can check out her blog for instructions on how to make this.

Next is this awesome wreath by Design Team Coordinator, Tonya Dirk. I love that scaled look she gave to the leaves. You can find instructions for this project on her blog.

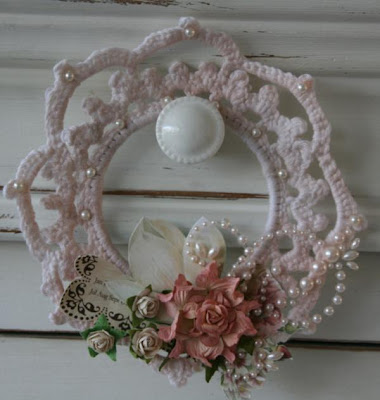
Lastly is this crocheted wreath ornament by former design team member Wendela Lam. I love the beautiful vintage feel of it.


Here are some other Christmas/winter projects from the gallery that are really inspiring. These gift tags by Annabelle O'Malley are so cute! I would love to get one of these attached to a present! She used the Cosmo Cricket "Jolly By Golly" line for these.


Next is this gorgeous bell ornament designed by Danielle Flanders. She said, "I found a few of these large jingle bells on clearance really cheap last year after the holidays and snatched them up...wasn't sure what I'd do with them, but they were too cute to resist. They came in gold, so I covered them with 2 coats of silver acrylic paint, added Diamond Dust on the top for the snow, made a bow with Melissa Frances crepe paper and added a Melissa Frances chipboard holly piece and a pearl. I also added a Melissa Frances rub on saying after the paint was dry."


Next is this so pretty snowflake ornament designed by Karla Smith who said, "This is my take on the Snowflake Challenge at Websters.. I really had fun with this one and love how it came out. This is huge. It measures 18" across. It hangs in the window so the light can come through. I used a foam snowflake and clear plastic snowflake I got at the dollar store, to put this together."


Then we have these really pretty shadow box displays. This first one is by Nicole Pomeroy who was inspired by the shadow box below by Lucy Edson.


Here is Lucy's version.


I hope these projects inspire you to get creative with your holiday projects. Keep checking the gallery for more inspiration from the design team and members.

Technique Tuesday with Mia Caniza

For this Technique Tuesday, I wanted to show you how easy it is to incorporate your scrapbooking supplies into fashion. I took some scrapbooking materials and turned them into some fun SATC Carrie-esque headpieces.

Here’s how to make a canvas headpiece.

Step 1: Trim off a 1 ½” piece & a ¾” piece from two canvas sheets. I used the Prima Canvas Printed Sheets for this. They were both 12” in length.

Step 2: Take some needle and thread, sew a running stitch through the length of the canvas pieces. Tug the string on one end to ruffle the pieces. Knot the string to keep it in place. Glue the ends together to make a ruffled flower.

Step 3: Take a 2” circular piece of felt and glue the large ruffled flower on the felt, keeping the flower tight in the center. Layer the 2nd ruffled flower on top of the first one.

Step 4: Add a large pearl center to the middle of the piece and some bling swirls.

Step 5: Take some hot glue and adhere the flower to the headband. Hold in place until glue cools and enjoy!


Here’s how to make a headpiece from paper.

Step 1: Draw 2 sizes of teardrop templates onto a piece of chipboard. Cut the templates out.

Step 2: Trace templates onto 2 different patterned papers. I used about 7 pieces of each size. Cut out the patterns. Take some matte gel medium and paint the topsides of the patterns. Let pieces dry.

Step 3: Spray the pieces with a sealant, such as Creative Imaginations Super Seal, to lock out water since we are working with paper. This also gives a nice sheen which makes the papers look like leather.

Step 4: Take each piece and crease the center of the bottom of the teardrop. Crease to the left and right of the center crease. Bend the ‘petal’ to curve the piece.

Step 5: Hot glue the large petals onto a piece of circular 2” felt, layering the petals as you go. Follow this with the smaller petals, also layering as you glue. Set aside.

Step 6: Cut out a 2” square from another patterned paper and glaze with some matte gel medium. Wait for it to dry then seal it with Super Seal.

Step 7: Take a brad and place it in the center of the square piece. Form the paper around the brad, making sure the sides are taught. Take a small elastic band and secure the formed paper around the base. Trim the excess paper so that it doesn’t show beyond the sides of the brad. Trim any excess of the metal base as well.

Step 8: Take some border stickers and some very fine wire. I used 2 sets of the same border so that it would be placed back and front.

Step 9: Place the wire in the center in between the 2 pieces of border stickers.

Step 10: Hot glue the covered brad onto the center of the petals. Curl the wired border sticker around a pen. Cut into varied lengths. Hot glue the curled pieces under the brad. Hot glue the flower on the headband. Make sure to hold it in place until the glue cools.


Hope you enjoy these quick and fun techniques on how to turn some of our scrapbook materials into some awesome and chic pieces of fashion for your wardrobe.

Member Monday with Staci Taylor

A new Member Monday and a new Layout of the Week. This week's Layout of the Week is brought to you by Staci Taylor who chose the layout below by Lauren Young also known as "lkylaurenkay" on the message boards.

Staci said, "I love when people find creative uses for products, and I thought the way Lauren used the chipboard frames on this layout was both unique and beautiful! I also love the hanging birdcages and butterflies that are dispersed throughout, and who can resist those darling photos of sweet baby faces?!"


"So Many Faces" by Lauren Young


You can see more of Laura's gallery here. And don't forget to leave her some love on this post or directly on her layout in the gallery here.

Photography Tutorials - Zoom Lenses vs Fixed Lenses

Our resident photography guru, Karen Grunberg, is back with a new video with some helpful information about lenses. Just push play!

You can learn more from Karen and her videos on her blog here.

December Kit Sneaks

I can't believe that December is right around the corner. This year has flown by. Are you ready for a December kit sneak. This kit is so versatile with new Jenni Bowlin, 7 Gypsies, some American Crafts and all kinds of gorgeous vintage findings. Have a look at the peek below.

This kit features red, black, cream, and green as its main colors so you aren't going to be limited to just holiday layouts. It is very versatile. You can preorder your kit here or sign up for a membership.

Meet Our December Guest Designer-Jamie Harder!

After pouring over the many fantastic entries, there could only be one winner and that winner is Jamie Harder. Read on to get to know her a little better and see some examples of her work. I can't wait to see what she does with the December kit!


"Hi! My name is Jamie Harder and I love to scrapbook! I started scrapbooking after my daughter was born five years ago, but it wasn't until about two years ago that I really got hooked, ok obsessed:-) I have just recently left my full time position as an environmental educator, so I can be at home with my girls. I feel so blessed to be able to spend so much time with them but if I am missing the work atmosphere, I am lucky enough to still be able to pick up shifts! Being at home has also freed up so much time for me to pursue my love of scrapbooking!
Scrapbooking is a passion for me for so many reasons: I love being able to document my daughter's lives as they grow and learn about themselves and our magnificent world; I love that it makes me take more pictures and that it motivates me to keep learning how to take better pictures; I love my creativity time, where I can "play" and just see what I come up with; and finally, I love the online community of fellow scrapbookers to share in this wonderful hobby with! I am so glad that I found A Million Memories...it is filled with amazingly talented artists and I know I will learn a LOT from you all! I am so thrilled and honored to be a Guest Designer!"
Have a peek below at some examples of her work.
"Fall Beauty"
"10 Things I Love About You"
"Ordinary Miracle"
You can see more of Jamie's work on her blog.
A special thank you to all that applied. There were so many great entries that we may have to do this again!

Design Team Challenge with Mia Caniza

Hi ladies! I came up with what I think would be a fun challenge for all of you.

Being scrappers we take a ton of photos, we download it into our hard drives, edit them in Photoshop & then often wait for that perfect layout or product to use with our photos. My challenge to you is to take a photo any time from now until the 28th & scrap it ASAP! Edit it all you want in Photoshop but the deal is you gotta scrap it right now!

I created my sample layout based on the fact that I was doing grocery shopping at the new place I found, which has a lot of the American brands I love, and I was able to finally find me some Crystal Light here in the Philippines. Before y'all think I'm crazy for doing a layout on Crystal Light, know that I LOVE this stuff & the last time I had any was like um 5 years ago when I was visiting Washington DC. So to say I'm thrilled is actually putting it lightly! Anyways, when I got home I took a picture of the box, did some creative editing in Photoshop & scrapped it. Here's the result:

To participate in Mia's challenge you need to upload your project to her thread and the gallery before midnight on the 28th. Good luck!

Technique Tuesday with Jeni Boisvert

Here with her first Technique Tuesday is Jeni with a cool video on creating unique embellishments from the chipboard included in your kit. Just click play!


Thanks so much Jeni!

Member Monday with Jeni Boisvert

It is a new Member Monday here at A Million Memories and today's pick comes from new design team member Jeni Boisvert. She chose the layout by Jamie, also known as "jj" on the boards. Jeni said, "I love how her elements seem so simple, yet they are pulled together so strategically design wise. I love how the photo is still the center of attention. Brillant!"

"Happy Place" by jj
***REMOVED FOR PUBLICATION***

Below is a little interview Jeni had with Jamie. read on to learn a little more about her.
1. How long have you been scrapbooking? I have been dabbling in scrapbooking since my first daughter was born over five years ago. I got serious about it, ok well obsessed, about two years ago:-) Now there is no stopping me! Scrapbooking is part of my daily routine and I crave my time to create!
2. Where do you get your inspiration from for your designs?
Everywhere!! I am inspired by the works of other scrapbookers, by sketches, by color combinations that appeal to me, by magazine ads, and by learning new techniques! Mostly though, I am inspired by the pictures I am scrapping and by the product I am using. I love the process of "playing" until it just seems to come together:-)
3. Do you always scrap 12x12 layouts? Or do you scrap other sizes as well? What about mini albums or altered items?
I do it all:-) I started scrapbooking in 8.5x11 and then switched to 12x12, which is what I mainly do now. I LOVE to do mini albums and find myself making them all the time as gifts! Recently, I have added card making and altered items into the mix and I am really having a lot of fun with it!
4. Do you have a blog address?
I sure do! It is http://ahappyscrappyplace.blogspot.com I so love the blogging world! What a perfect way to connect with people from all over who share in this wonderful passion!

You can leave Jamie some love on this post or directly on her layout in the gallery here. You can see the rest of her gallery here.

Little Something Sunday with Rachel Hall

One Layout / Two Seasons
Creating multiple layouts using a similar concept


When I created my layout "Let it Snow" I fell in love with using masking and stitching on seasonal layouts to really emphasize an iconic seasonal image, the snowflake.
I immediately began to think about other ways in which to use this idea for other seasonal pages. The result of that brainstorming? A fall layout with masked and stitched leaves.

In creating this layout, I essentially scrap-lifted myself, but achieved two entirely different layouts.

To create this layout:
Choose your cardstock for the base of your page. Keep in mind that the color of the cardstock will show through so make sure it is the color you want!

Using chipboard shapes (or masks, stickers etc) and glimmer mist, mask and mist your shapes onto the cardstock. I did mine along the op since I knew I would be covering the bottom half of my page with patterned paper.

Choose your patterned paper( s ) and tear and roll them as desired. Adhere to page.

If you plan to stitch the masked shapes, now is a good time to do so. Punch your holes where you will be stitching and stitch using a backstitch.

Add photos, title and embellishments to your page and you are done!